HappyMonkey/HMD WOODSHOP
Alright. So I'll catch up to the present on my bookshelf construction. Unfortunately, it's sort of late in the game, so I won't be able to show all of the steps in progress, but here goes.
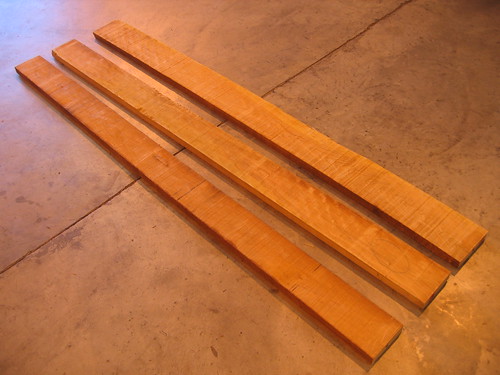
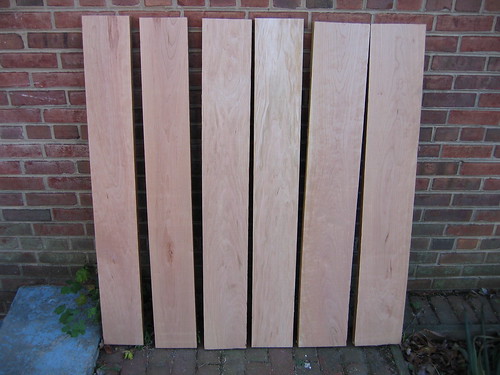
We bought most of the wood rough, 4/4 cherry, at least 11 1/2 inches wide. (This was not cheap.) For the top, we got some planed poplar and cherry. We then spent one weekend putting the rough wood through our planer. We brought the bottom piece down to about an inch, and the verticals to about 3/4 inch.
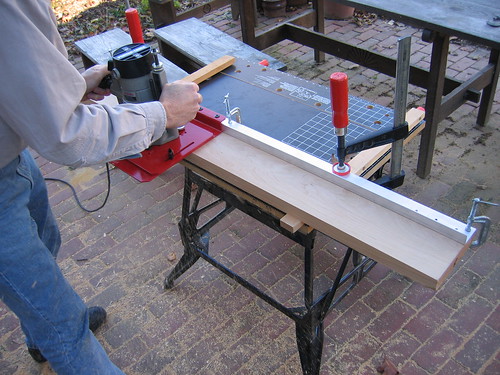
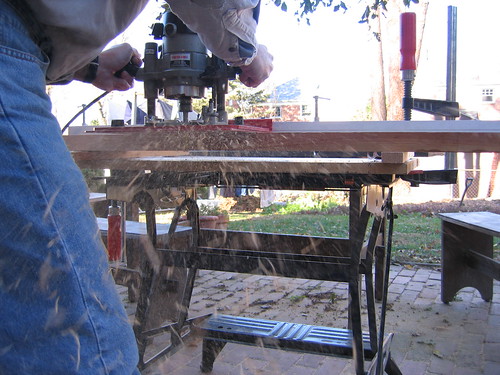
We used a router against a guard to straighten one side, then used a square to draw square ends, and routed them square. We marked off the desired width at intervals along the board, and routered that off. We could have used a tablesaw, but they make a big mess and are unwieldy for long boards. We don't have a roller table or a bandsaw, either of which would make this part easier.
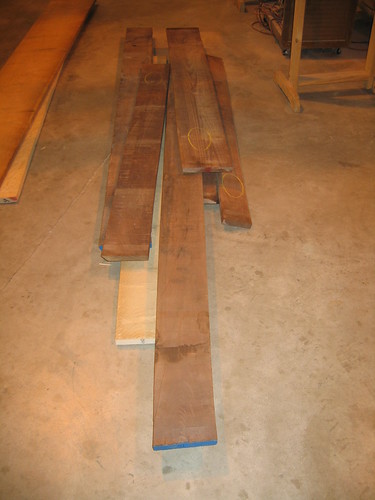
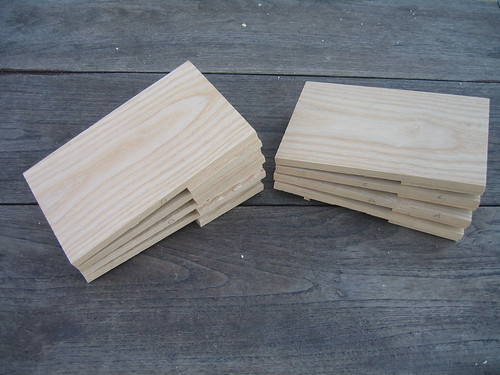
Here's the wood for the basic framework. It has already been shaped, but you can get an idea of the dimensions.
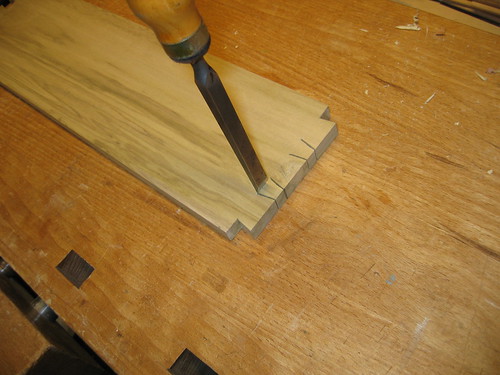
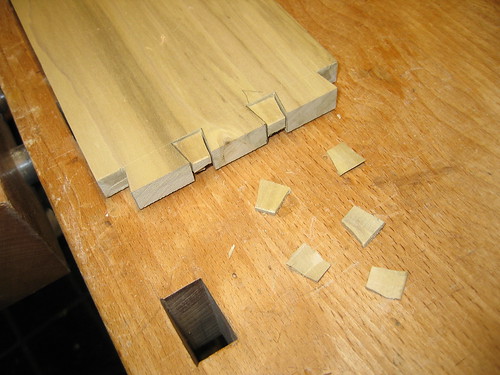
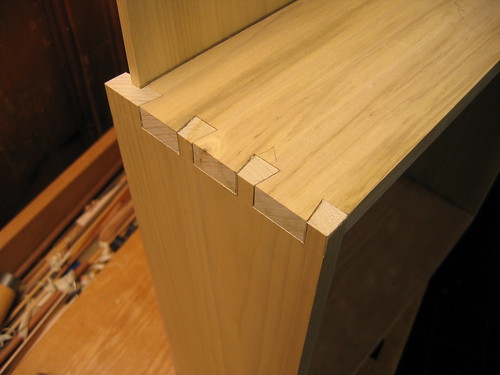
The next step was to start shaping the boards. This is the top of one of the verticals. The cuts into the grain were made with a dovetail saw. The cuts across the grain were made with a crosscut saw. The crossgrain cut in the middle was done by repeatedly scoring and chipping it out with a chisel. We used a router to thin down the tongues, and a chisel to clean it up.
The holes are obviously drilled, and the bottoms squared by chisel.
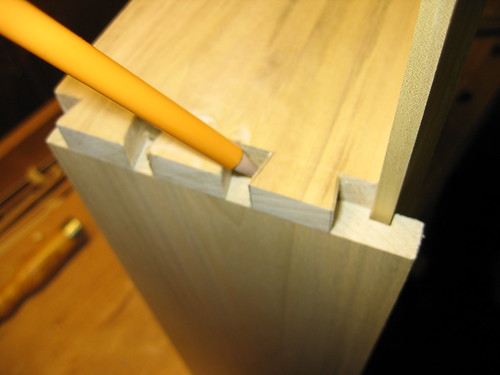
Here's the bottom of the sides. The same methods were used as at the top, but it is obviously much simpler. I'll get back to those holes in a bit.
The bottom of the center vertical is a shorter version of the top and is not pictured.
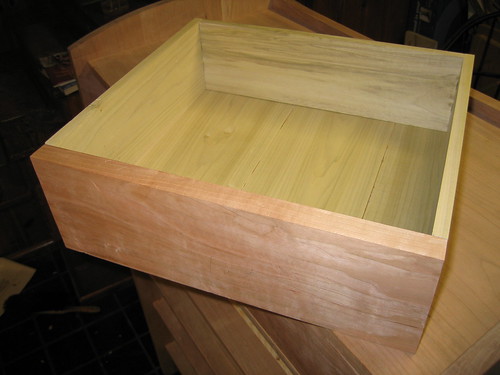
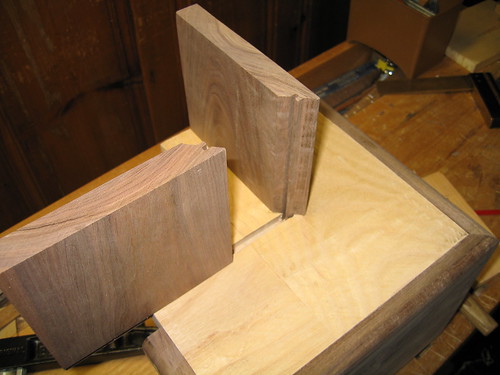
Here's the other side of that joint. The board on top is the bottom, upside down, and the board on the bottom is a side, inside up. :)
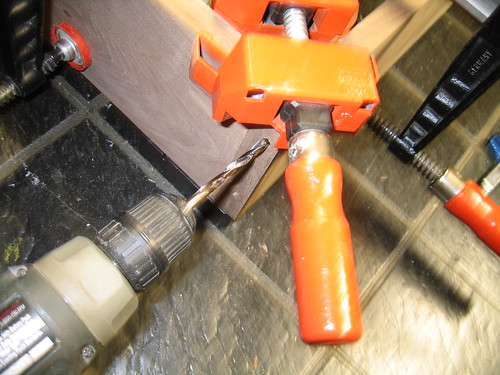
The jig was used to drill the holes for the screw and insert shown. I'll get back to that after a quick sidestep.
These are placed every 10 to 12 inches around the back of the frame. They are to hold the plywood backing on. I didn't purchase the specialty screwdriver bit for these brass inserts, so I improvised. The two nuts are tightened against each other, and the insert placed on the tip. The whole thing is put inside a small block of wood with a hole drilled through, which is clamped in place over the predrilled hole. I used a power screwdriver to drive the insert in. Sometimes when I tried to screw it out, the insert wanted to come with it. In that case, I loosened the nuts from one another, and it came out easily.
The inserts are about 3/8 inch deep, because I will be routering a lip into the edge of the wood, for the plywood to rest in.
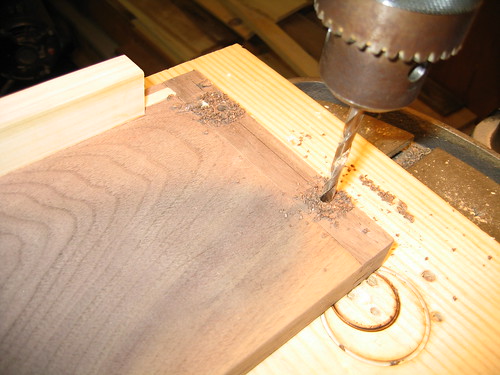
The center vertical has the same tonge joint on the bottom as all three verticals have at the top. Here are the holes for those tongues. They were drilled, then squared with a chisel. The same was done at the top.
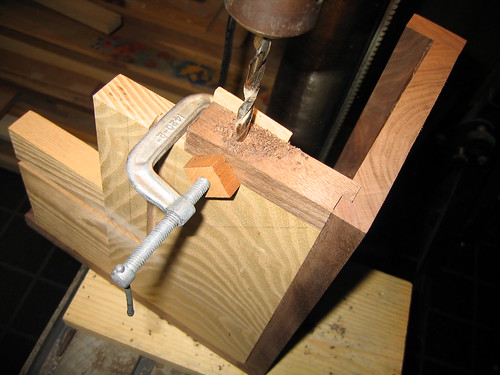
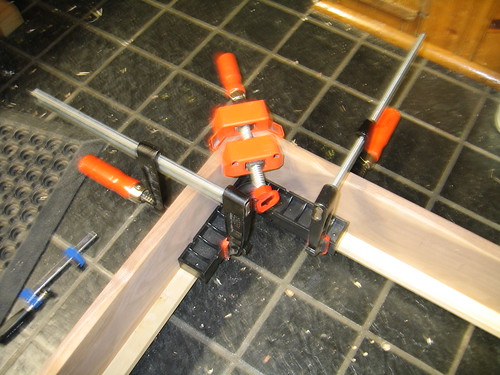
Ah, back to the jig. When in use, it was clamped in place, and the boards were clamped in position, but this is easier to see. The thick drill bit is for an insert which is essentially a steel cylinder with a threaded hole through it. A long bolt goes in where the thin drill bit is, and through the threaded hole in the insert. When tightened, the joint is pulled together.
I wanted this to be a "knockdown" bookcase which could come apart easily. Otherwise these joints would be dovetails with pins.
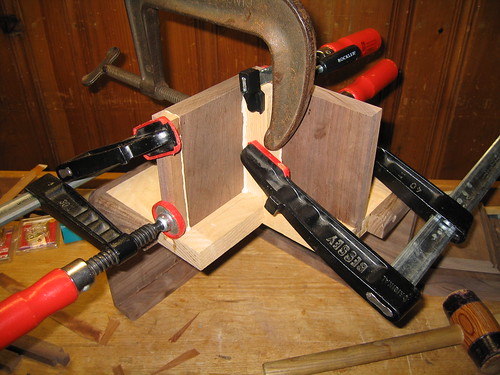
And here's the joint, all put together. You can see the inserts peeking out a bit.
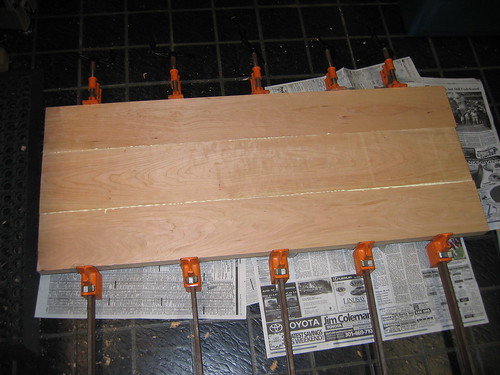
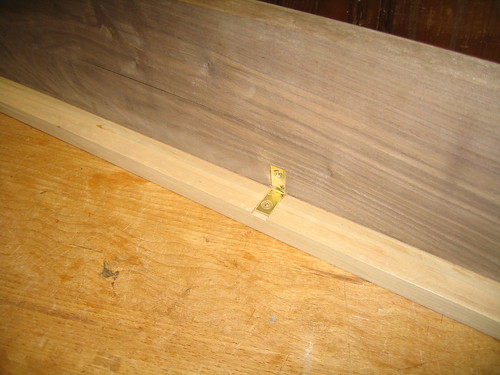
OK, finally a glimpse of the top. 13-inch-wide cherry is quite expensive, and hard to find, and this is above eye level, so I decided to have a poplar board edged with cherry. The front cherry is just glued on. For the sides, I had to put a thin strip
of walnut in the joint, because glue doesn't work well on endgrain. I did the same for part of the diagonal joint at the corner.
Cross Section:
_ = air C = cherry, W = walnut, P = poplar
__CCCCCPPPPPPP
__CCCWWWWPPP
__CCCCCPPPPPPP
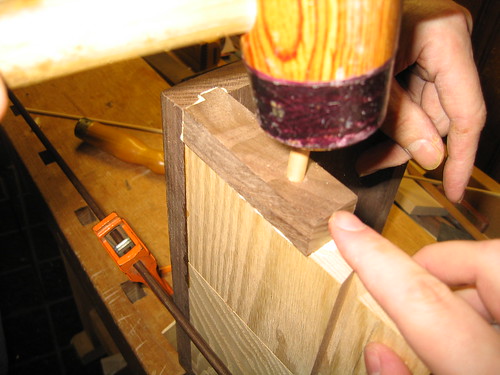
The pins throuh the tongues need to be shaved down a bit, so they can go further in.
Here are the patterns for my walnut feet. I drew a schematic of the existing framework of the corner, and put that on a light table. I then drew each pattern over it, using a French curve, and cut them out.
These are the shelves, cut to roughly the final length. I lost one shelf, due to measurement error. Here's the biggest tip in woodworking: [COLOR=crimson]Measure twice, cut once.[/COLOR]
And here's a portrait of the proud craftsmen with the assembled frame. Sorry it's cut off - it's hard to get the whole thing in one shot in the room it's in.
My dad has begun working on the straight pieces of the next project - a Windsor chair. He starts from square stock, and shaves it round with a plane.
And here's where he is so far.
:)
wow.
I gotta get to a REAL lumber yard. I'm making stuff out of shitty home depot pine planks. Nice work, monkey and monkey's dad. Your dad looks like a wood shop teacher.
keep the pics coming! i love it!
And finally (whew), here's the chair he made in the class he took.
Originally posted by lumberjim
couldn't he just get dowels? that seems so tedious. and inexact. or are you going for the homemade look?
I think he enjoys it. Perhaps it's the homemade look. Perhaps he just wants to use some of the stock we already have. I'm not sure.
Originally posted by Happy Monkey
Here are the patterns for my walnut feet. I drew a schematic of the existing framework of the corner, and put that on a light table. I then drew each pattern over it, using a French curve, and cut them out.
Nice use of the Freedom Curve.
Dowels are not appropriate because the grain isn't consistant. They could break off instead of flexing.
edit- I forgot to mention how awesome that chair is. It must be great having a Dad with so much know how.
The next step was to rout out a lip for the plywood back to rest in. We took out the middle upright and put it back together, then laid it facedown on some pillows and styrpfoam blocks. My dad ran along the inside back wit ha router, and I squared up the corners with a chisel.
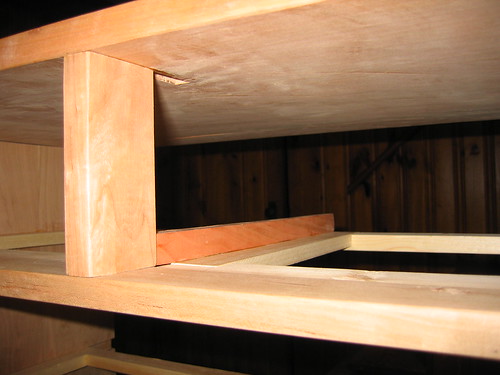
As an aside, this view shows the cross section of the joint holding the endcaps on the top, which I illustrated with truly awful ASCII art a few posts back. It also illustrates wh the screw insets were put so deep, and why it would have been difficult to put them in later - screwing into a stepped surface is very difficult.
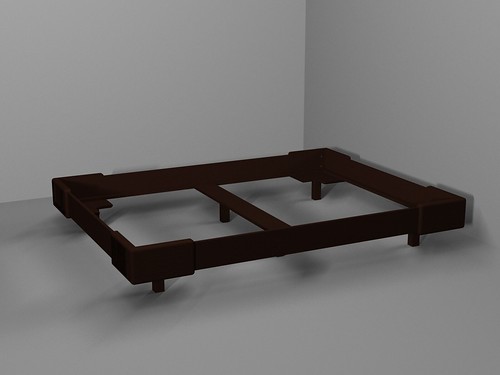
Here's an interesting aside. Before I started work on the bookshelf, I did some design work with
POV-Ray, to play with dimensions and to see whether the pins sticking up would look too odd. Here's the result.
[SIZE=1]forgive the overdramatic background.[/SIZE]
Two points HM... first is, is that bookshelf square? Or is it just the angle or my eyes? It looks like it's on an angle to me.
Second: You really should use a sharp bit in that router...you're burning the wood.
Brian
It's the angle. The frame is square, but it's got some give, which will be fixed when the back is in.
The burning is not really an issue. That area won't show. But we probably should deal with that for future use.
Originally posted by BrianR
Second: You really should use a sharp bit in that router...you're burning the wood.
Who knows anything about sharpening stuff? good resources etc..?
So, with the walnut for the feet cut to rough lengths, my dad routed a design into the top edge. This was pretty thick wood, so I had to find a pretty big router bit.
I then drew a cut line far enough from the edge to leave room for error, using a square.
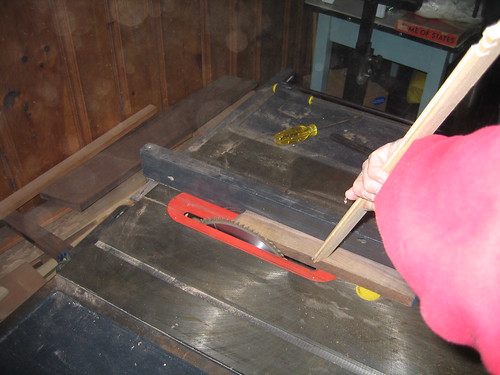
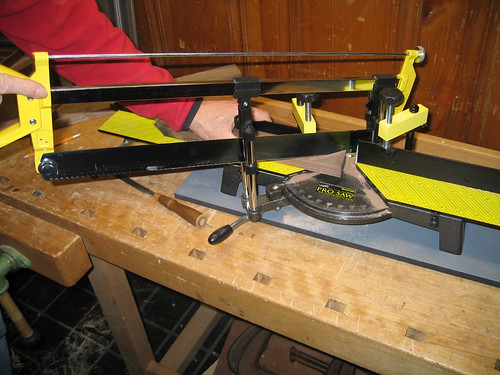
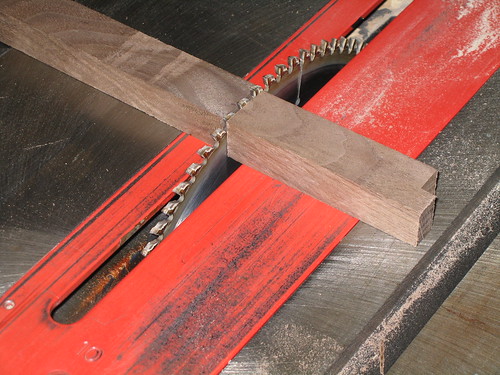
We tried using a chopsaw to cut the 45 degree angles...
...but it wasn't accurate enough, so we set up the tablesaw using a protractor. Good thing we left the extra space.
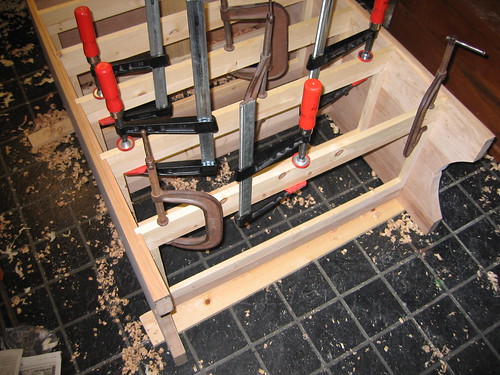
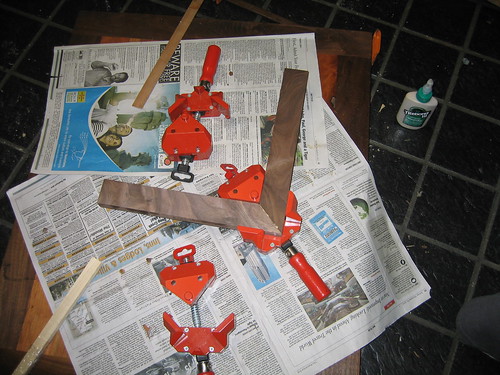
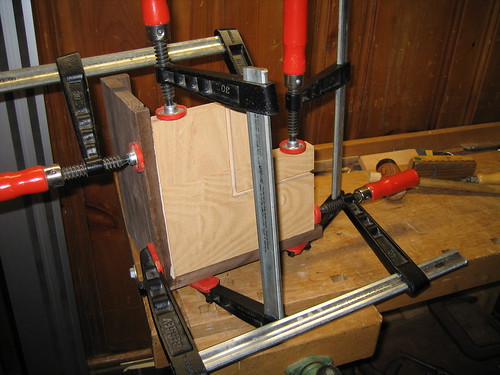
And here's the test of the joint. These clamps are great for corners, whether it's furniture or picture frames.
With the corner edges cut, I traced the pattern, and cut it out with a scroll saw.
I used a drill press and a sanding drum, and my father used a drawknife (not pictured), to smooth out the sawcut.
Then we used a fancy mortise jig on the tablesaw to cut a lip into the inside top of the feet. Obviously, you don't need all the hardware to do it, but if you've got it, flaunt it.
And here's the first rough cut of the feet.
I didn't get to do anything over the weekend, but my dad glued up the feet, smoothed over the ends, and glued in some blocks on the inner surfaces of the corners.
Next, we prepared the plywood backing. It is 1/8 inch birch plywood, so it is quite flimsy.
First I measured the same distance from one edge at intervals, using some scrap wood to make sure the tape measure didn't go too diagonally, then I used a straightedge to connect the dots.
Then I put masking tape along the line, to minimize splintering, and my dad cut it with a circular saw.
We then shaved it down with a (very sharp) plane, until it fit in the groove on the back of the bookshelf.
We ground notches in the edge with a dremmel, to allow for the bolts which will hold the backing in.
And here's what it looks like with those screws in...
...And from the front. We're getting close to finished.
For the molding around the top, we routed one edge of a board, cut it off with a tablesaw, then repeated the process.
We also ripped off two slices from some of the spare wood from the shelves.
We used the chopsaw to make a angle joint in the molding, for the corner.
For perfect placement, we wanted to place the molding while the frame was together. The masking tape is to avoid unwanted gluing.
And then we glued it. Once the glue got a bit solid, the excess glue was scraped off with a chisel.
[SIZE=1]whee! post 500![/SIZE]
man, monkey. you guys don;t fuck around, do you? very precise work. I'm very impressed. Dad's got a pretty mean tool set, too, huh?
some day, baby, some day.
tell your pop he's my hero, and keep the pics coming!
Waste of time, though. You could have gone out and bought that bookcase for what, 7 maybe 8 thousand dollars. :D
He's got a lot of tools, but there's only a few that get used all the time:
Router
straight edged chisel
drill (a drill press is nice, and occasionally necessary)
tablesaw
Lots and lots of clamps. Those red-orange clamps with the plastic pads are great. Home depot has them.
workbench
a very sharp plane
And if you want choices when buying wood, a planer is a necessity.
Waste of time, though. You could have gone out and bought that bookcase for what, 7 maybe 8 thousand dollars.:D
For the amount I spent on materials, I could have gotten about twice the shelfspace from Ikea...
Nifty! I'm a Master Dwellar now!
For the amount I spent on materials, I could have gotten about twice the shelfspace from Ikea...
HA! The stuff you can find on the market, isn't worthy of holding your tools. What you (and Dad) have built, vs commercially available bookshelves, is like comparing Moon/Mars Rover to a beach buggy.
Now you've got to have some kids because you've created an heirloom.:)
Indeed.
Also, I can't stand shopping for furniture. All of mine is either handmade or handed down.
Wow, it's really encouraging to see someone still makes their own funiture and that someone makes *quality* furniture. I know from experience there is great satisfation to be found bth working with wood and making things yourself. Sadly for now I can't own anything that doesn't fit in a suitcase. C'est la vie.
That's great, I tried to get into woodworking but I don't have the patience. I like to screw up and then fix my mistakes, doesn't work so well with wood.
No worries! If you make a mistake, just cut off the mistake, and make it smaller!

[SIZE=1]no, I didn't make these[/SIZE]
The middle foot has a bar going back, which the base rests on. The end of the bar is in a groove in the back of the foot. The groove was cut with a tablesaw and cleaned out with a chisel.
The bar is solidly in the groove, and attached with three pieces of hardware designed for chairs. These are much stronger than normal angle irons, due to the 3D shaping - not that it's a joint that needs to be that strong, but I had the pieces from a previous project.
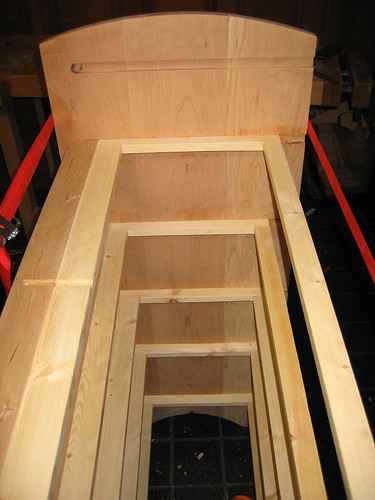
Long time no post. I'll start off with a picture of the piece all together, face down in the work area. It just fits, with inches to spare.
I spent a day sanding all of the pieces down with an orbital sander, and following up with some extremely high grit sandpaper.
Next was to drill the holes for the shelf pegs. I have this nifty jig I got from rockler.com that goes with this nifty drill bit, which goes with some nifty brass inserts that the shelf supports fit in. :)
Well, partway through, the drill ran out of juice, so I went on to the next step. These blocks will be used to attach the feet to the bottom. If you look closely, you can see that the grain on each block goes in the same direction as the grain on the board. Otherwise, the glue would not bond properly. The excess glue was scraped off with a chisel once it partially dried.
If you look closely, you can see that the grain on each block goes in the same direction as the grain on the board. Otherwise, the glue would not bond properly.
I never heard that one, HM. Now I'm going to be up all night trying to figure out why that would be true.:)
looking good, HMonkey, looking good.
Originally posted by xoxoxoBruce
I never heard that one, HM. Now I'm going to be up all night trying to figure out why that would be true.:)
Here you go. Sorry I didn't get it to you until the next morning. :)
Oh, ok. you're talking about end grain vs flat grain.
I thought you meant both pieces had to have the grain running parallel rather than across the other. My bad.:blush:
Hmm. You were right the first time - I was talking about the grain running parallel rather than across the other. I guess I didn't read that article closely enough. I haven't found any article to support it, though, so maybe it's not true. One possibility is that the expansion and contraction in different directions could hurt the joint, but that'a certainly not an issue at the size of my blocks.
Maybe I just wasted a bit of effort. Oh, well.
We put the foot up against the blocks, then stuck a pencil through the holes, to mark it. Then we drilled the holes and sunk some threaded inserts, as with the back.
Back to the shelf peg holes. Once I used the jig to put holes up and down each side, I put two brass inserts halfway into two holes, and propped the jig against them. I then marked the approximate location of the hole through the jig.
With another brass insert on the opposite side, I laid a ruler between them, and marked the top...
Using those markings, and the original two brass inserts, I clamped down the jig, and drilled eight holes down the middle.
So here are the uprights, with the holes drilled. The middle row of holes are for a half shelf at the top, to make a tiered place for paperbacks.
Here is the middle foot. From the last picture, tongues on the bottom of the middle upright go through slots in the bottom board. The two boards on this foot clamp around each side of the tongues, and the bolts go through the holes, to pull it tight. These bolts are obviously too long. I need to get some shorter ones.
[SIZE=3]Curses![/SIZE]
On my first board, I was not using the drilling jig properly, and there was some drift. By some, I mean a lot. So I had to fill in and redrill the holes. Luckily, when I put the brass sleeves in, they will cover up most of the evidence.
Anyway, to start off, I put masking tape over the rows of holes at the point where things started going wrong, and then cut out the holes with an exacto knife. This was to prevent glue from getting onto the good surface, and preventing the oil (later) from soaking in.
Next, I cut a ton of pegs from some dowels we had lying about. To get the length, I drilled some holes in a scrap board, stuck the dowels in, and cut them off with a scroll saw.
With the pegs cut, I put glue in the holes and pushed the pegs down into the holes with a pencil.
Once the glue had gotten very tacky (but not dry), I pulled the tape up over the pegs. This way, the glue doesn't dry with the tape stuck under it.
Also in this picture, you can see the scrap wood I used to test this technique.
The next day, I cut the tops of the dowels off, and my dad smoothed the cuts over with a chisel.
This saw blade had too much of a kerf (the teeth pointed slightly outwards perpendicular to the blade), so I put a few layers of masking tape on one side to prevent scratching.
Once that was done, my dad resanded it, and I redrilled the holes. Today we oiled all of the pieces. Unfortunately, I forgot my camera. I'll put some pictures up later.
Impending woodshop project alert!
I have been contacted by a person wanting me to build them a full-fledged casket (to their plans) to become a display item in their yet to be completed purchase hearse. :eek:
Should their deal go through, I will get the order to build.
Should I get the order to build, I will start a thread so that you may monitor the progress and see the finished product.
As promised, here are the oiled pieces, after drying for a couple days.
Time to insert the inserts. Just stick 'em in, and whack 'em down with a mallet.
[SIZE=1]edit:[/SIZE] This shows the worst of the dowel-refill/redrill board, so you can see the final result. The bad bits are in back, so they won't be very visible at all.
Here's a contrast of the oiled sides with inserts to an
older picture.
Next is the plywood backing. The face is extremely thin and prone to chipping, so I've been masking it off with masking tape, and putting a thin layer of glue around the edge. Next, we will put stiffening wood strips on the back. On its own, eighth-inch plywood doesn't feel much sturdier than the cardboard on cheap Best Buy entertainment centers.
Looks much nicer though.
The project is coming along well. Good job so far. Even the couple mistakes with the drill holes are so small nobody would notice them if you hadn't pointed them out to the ENTIRE world on the internet.
If the putty on the holes bothers you, you can always get a finishing touch up kit and try to blend the color of the putty. It looks fine to me though. Once you have stuff on those shelves, you won't be able to see a thing, even when looking for them.
Is that a home-made bow saw hanging on the wall in the last picture you posted? Does it see much use? I don't have a band saw, and am in the process of building a bow saw instead. I started in the summer. (Haven't been able to spend much time in the shop lately.)
Originally posted by glatt
The project is coming along well. Good job so far. Even the couple mistakes with the drill holes are so small nobody would notice them if you hadn't pointed them out to the ENTIRE world on the internet.
Heh. Thanks. I'm actually pretty happy with the result.
If the putty on the holes bothers you, you can always get a finishing touch up kit and try to blend the color of the putty. It looks fine to me though. Once you have stuff on those shelves, you won't be able to see a thing, even when looking for them.
It was actually dowels, not putty.
Is that a home-made bow saw hanging on the wall in the last picture you posted? Does it see much use? I don't have a band saw, and am in the process of building a bow saw instead. I started in the summer. (Haven't been able to spend much time in the shop lately.)
No, it was purchased. I don't think it's used much, but we've got a number of saws.
Originally posted by BrianR
Impending woodshop project alert!
I have been contacted by a person wanting me to build them a full-fledged casket (to their plans) to become a display item in their yet to be completed purchase hearse. :eek:
Cool project.
Casket or Coffin? ;)
You answer your own question, my dear.
The quote specifically states "casket". Yes, I know the difference.
Actually, the casket will be easier. I've built coffins and that angle at the shoulder is tough to make sturdy enough for repeated use, unlike those that only need to be used once and buried forever. Or burned. I should point out though that persons being cremated are baked in a cardboard box and not the casket you bought for them. I read the textbook for future funeral directors once.
The hardware is what concerns me the most...I can't just go to the hardware aisle of my local Home Despot and buy casket handles, hinges and latches, not to mention the decorative touches. I'll have to order these online from a retailer of such items. I have several manufacturers already lined up but this stuff is EXPENSIVE! Sheesh!
Maybe I can sneak in a piano hinge instead and hope he doesn't notice.
Brian
Originally posted by BrianR
[...]persons being cremated are baked in a cardboard box and not the casket you bought for them.
I wanna be baked in
Le Creuset .
When we were picking out a casket for my Dad, they had some pine boxes that were built with no metal, for cremations. The whole thing was glued and pegged with no nails, screws, hinges or handles.
Originally posted by Happy Monkey
Next is the plywood backing. The face is extremely thin and prone to chipping, so I've been masking it off with masking tape, and putting a thin layer of glue around the edge. Next, we will put stiffening wood strips on the back. On its own, eighth-inch plywood doesn't feel much sturdier than the cardboard on cheap Best Buy entertainment centers.
Looks much nicer though.
Are you just reinforcing the edge with glue? The project will still be a knock down, won't it?
BTW, super job, you done good. :beer:
Thanks.
Yes, I'm just smearing glue along the edge, since the facing was chipping and peeling a bit along the edge. It'll still be knockdown. If it wasn't, it wouldn't be going anywhere once it was together.
Whew! I thought you were trading that new car in on a truck.:D
update, my friend won the auction and is scooting around town in his very own hearse (with a flame paint job no less).
We're talking about the casket now.
Brian
my dad used to be a bassist in a band when i was little. When he was youger, a friend from the band had a Packard Hearse. They played proms, and had a casket sized orange ( the fruit) crate that they'd pull out of the back. A member of the band would rise from the coffin, and they'd unload the rest of the gear.
We traded a '77 Cadillac hearse a few years ago. It was beat pretty badly, but I was amazed at how substantial the rear suspension was. It was like a delivery truck to drive. It took the guy a good hour to uninstall his array of kicker boxes and preamps. It had big aluminum rims and BF Goodrich whiteletter radials, too. I thought it was pretty cool. I think he got $500 for it because I remember thinking that the wheels and tires were worth more than the car.
This one is an 81 Cadillac hearse. I'm trying to get him to send a pic of it that I will post if he is able.
I *gotta* see the flaming paint job on a hearse.
I hope he has his camera and didn't leave it with his wife, in VA as I think he did. SHE has the baby you see and you know how women love taking pictures of their offspring.
A quick plug for the oil I use, if anyone was curious.
Today we started cutting the shelves to size. Due to imperfections in the construction (alas), I am marking the approximate location each shelf is cut to fit, along with the direction it is supposed to face.
All but one of the shelves are cut and oiled. Today I oiled the plywood. In preparation, we glued some stiffening slats on the plywood.
Here is one of the plywood sections oiled, and the other plain.
I also oiled the pins for the top.
Almost there. I'm going to put some short pegs on the underside of the shelves, to keep them from sliding forward, then wax everything, and it's done!
A shelf just resting on pins can slide out, so I drilled a few holes, and added these pegs with a dab of glue, to lock the shelves in place.
Then it was time to wax everything.
Smear the wax on with one rag, rub it down with a second, then buff it with a third.
Unfortunately, two of my glue blocks did not hold. Before waxing the bottom, I had to reglue, and add screws to all four blocks.
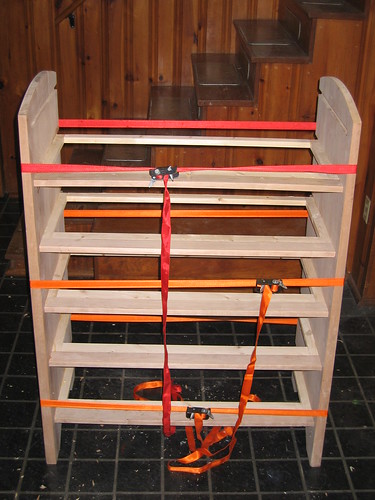
Here are all of the parts, relocated to my bedroom.
And here, at long last, is the
[SIZE=4]completed bookcase![/SIZE]
And, finally, here are the proud woodworkers.
oh, man. and you already started your teddy bear collection. You've been around bruce too long, it would seem.
[big round of applause]
excellent! it looks just like the computer generated image you posted. I am seriously impressed. how cool to see it go from start to finish. thank you very much, Hmonkey.
Thanks. That teddy's been around for quite a while, though. I expect he lost hope for a collection long ago.
That is a most wonderful achievement. It is a beautiful piece of furniture! I wish I could do stuff like that. I can barely assemble Ikea furniture.
Man that thing's gorgeous. I'm such a sucker for shimmery wood grain. You've definitely earned the right to be extremely proud of yourselves.
Wow, you think it's bad to lose an Ikea piece in a divorce. What do you do when the judge gives her that.:mad:
Kudo's to you and your Dad!!
Excellent work! I'm jealous. But then again, I use power tools mostly... I do not have the tools OR the skill to do it the old-fashioned way like you do!
Salud! :beer:
Originally posted by BrianR
I do not have the tools OR the skill to do it the old-fashioned way like you do!
Heh. We don't have the space for all the power tools we'd like, or we'd have more. But there is satisfaction from doing it the old fashioned way.
It is sometimes funny watching "
The New Yankee Workshop". If someone played a drinking game where you chug a bottle every time Norm uses a hand tool, that someone would never get drunk.
On the other hand, I think I need more power tools than they use in "
The Woodwright's Shop".
The Woodwright's shop is awesome. That guy kick's Norm's ass.
What I would really like to see is a show where the woodworkers from Colonial Williamsburg make stuff with hand tools. Fine quality projects made the old fashioned way.
The Woodwright's Shop was a little too rustic (sloppy) for my tastes, but I liked the idea of doing things with hand tools.
One of the things I like most about hand tools is that they are quiet and dust free. You don't need the earplugs, fogged up goggles, and dust mask. You just pick up the tool and work.
I wouldn't skip the earplugs when using a mallet and chisel, but otherwise I agree.
On the other hand, power tools have a satisfaction of their own. :D
One of my ex-girlfriends does color matching and finishing for a shop that makes 18th century style furniture to order. This is the breakfront she's starting now.;)
No, you can't afford it.
:haha:
Ok, so what's next, Hmonkey?
Not sure yet. Perhaps back to the chair. Maybe a chest of drawers for my brother. I'll probably take a break for a while.
Bruce - Damn. That's pretty cool. I haven't done anything with glass yet, though my parents are replacing the windows on their weekend house in West Virginia.
Yeah HM, I thought you'd appreciate the wood and detail in that breakfront, especially considering they're using pretty much the same tools you are. Personally, I'd rather have your bookcase for myself. :)
The third set of legs obviously needs to pee.
(looks like furniture that Alex, from A Clockwork Orange, would have, doesn't it?)
Nobody gets to sit at the head of the table.:)
Well, that takes a certain amount of... umm... technical skill.
Hard to think of a place to put it, though.
HM, I apologize for being so late in congratulating you on such a beautiful peice of craftsmanship. I hold quality wood workers in extremely high esteem.
Noone answered my request for help with the Ashiko, so I would like to post it here.
I would like to sand and refinish the drum. I do not want to stain, I just want to clean and highlight the natural wood.
Should I just clean it and use furniture polish? Should I apply a polyurethane spray to it in addition?
Can anyone tell me what kind of wood is used in the Ashiko? All I can say for sure is that it is stave construction.
I included a picture in the
threadThanks!

Rich, I think you need to talk to somebody at a drum shop. I'd guess the wood is some kind of hardwood from the tropics, like a mahogany. If it were mine, I'd probably rub cut linseed oil into it to keep it from drying out and cracking but its not mine so I'd hate to have you mess it up. I don't know how goat skin would react to contact with the oil. My bodran came with a polyeuthene finish and I haven't altered it.
Rich, I think you need to talk to somebody at a drum shop. I'd guess the wood is some kind of hardwood from the tropics, like a mahogany. If it were mine, I'd probably rub cut linseed oil into it to keep it from drying out and cracking but its not mine so I'd hate to have you mess it up. I don't know how goat skin would react to contact with the oil. My bodran came with a polyeuthene finish and I haven't altered it.
Thanks for trying. I searched on 'goat skin' and 'linseed' and found this:
Great drum for someone looking for a professional Mali djembe and that doesn't want to pay the price for a Kangaba. Made from from lengue, dugura, or djala wood, these djembes are rebuilt by us as with all of our drums. Comes with top of the line 5mm rope, new cloth, custom fit hoops, new Mali goat skin, and the shell is oiled several times with linseed oil.
I also found an
Ashiko maker which lists Danish Oil, Linseed Oil, and Polyurethane as drum body finishes, although it is not specific if these are individual choices or in combination. I'm going to sand it, clean the inside with wood soap, rub on warm linseed oil, let it soak in for a few days, and finish the outer shell with Polyurethane. I do not want to mess with the inside of the drum besides cleaning it since it might affect the tone.
If you oil it, the polyurethane won't stick. Like trying to paint butter. The linseed oil never dries. Watco will dry, but I don't know if you can coat it. You have to talk to someone that's familiar with the wood in your drum, to find out the effects of the finish choices. You may have to do the same thing to the inside as you do to the outside in order to make the wood move evenly during changes in moisture content. ;)
Anybody looking for a woodworking project?
This is too cool a thread to let die. More wood projects, please. Not dick ones though. eww.
My dad's been making boxes and picture frames. I've got some plans for a box for my tapecraft supplies that we may make some time soon.
I'm going to try to start making some built in cabinets for my bathroom this week. I'll post the progress (or more likely the lack of progress) here.
I don't mean to hijack this thread, but it's kind of dead, and I figure I'll keep it alive with a project I'm working on.
The current project:
Our upstairs bathroom is one of the ugliest rooms in our house, and I've been meaning to address it for a long time. It has self adhesive vinyl floor tiles, and glued-on vinyl strips of "baseboard" trim. The fixtures are the cheapest money can buy, and they look it. The one good thing about this bathroom is that it is the largest bathroom I've ever had, so there is potential. I've been planning to build some cabinets into a nook in one corner. I've been sketching things for a few months, but this week is finally the week. I took this week off from work because I'm not allowed to carry too much leave over from year to year. So I'm forced to take a vacation and I might as well work on this bathroom.
You might notice that I'm posting this on a Tuesday. I didn't actually get any work done on the bathroom yesterday. It was the first nice day of the year in Arlington, Virginia, so I trimmed a tree that was too close to our electrical service entrance, and I washed our car. In my short-sleeve shirt! So Monday was a good day, but I made no progress.
Today, I planned to go to Home Depot, buy my lumber, and bring it home in a rental truck. Well, it started to snow on the way to Home Depot, which was a huge drag after hanging out in my short sleeve shirt yesterday. I got there, and checked with customer "Service" to find out about the truck rentals before I loaded up my cart with hundreds of pounds of lumber. Turns out the computer system is down, and they won't be renting any trucks today. So I drove home, and put the roof top rack on my car. I drove back, and bought two sheets of 3/4 inch birch plywood. It's about all the weight my roof rack can hold. As I was loading the plywood onto the roof of the car, the damn wind kept howling through the parking lot, trying to pick up the plywood and carry it away. The snow had stopped, but the parking lot was all iced over. I nearly ruined my back wrestling that plywood onto the roof of my car in the wind, and then down into my basement when I got home. I was originally planning to make another trip or two to get the rest of the lumber I needed, but called it off because of the wind.
So instead, I went up into the bathroom, and cut up the vinyl flooring where the cabinet will sit. The bare floor shows where the cabinet will contact the floor. The cabinets will actually be larger than this, the toe kicks are 2.5 inches deep.
After I figured out what the shape of the base will be, I needed to actually make the base. I have plenty of scrap 2x4 material lying around, so picked through the pile the best I could to find straight pieces, and I cut them all to length.
I have a huge box of leftover 2" drywall screws. They will be perfect for screwing the base frame to the floor. Only problem is the base frame is 3.5 inches tall. So I drilled all the pieces to create pocket holes for the screws. The screw will have about an inch of material in the 2x4, and then another inch of the screw shank will penetrate the plywood subfloor to hold the base down.
I put all the pieces in the bathroom to see if they fit. The kids are in bed now, so I'm not going to do any more work right outside their rooms. Tomorrow, I need to shim the base as needed to make it level, then I will screw it down to the floor. Another trip to Home Depot if the weather is better, and I can start making the cases.
I don't mean to hijack this thread, but it's kind of dead, and I figure I'll keep it alive with a project I'm working on.
No worries! It's no hijack. The more the merrier! Especially more than zero...
You guys would laugh your asses off at my dog stairs project, the goal of which was to give the older dog a step-stair to make it into bed at night. I fitted together thin plywood "any which way", with just enough thought to making it sturdy enough for a 12 pound dog, and then attached spare carpet to it with little brass screws.
At the time I was proud that I pre-drilled the screw holes. I only sanded it down enough that it wouldn't give me splinters or mess up the carpet.
I'm happy to see how these sorts of things are done right. There are many other projects that could stand doin'.
Any project that does what you intended it to do is a success. It doesn't have to be elegant, clever or pretty to be a success, all that stuff is a bonus. ;)
Wow, whose bed is it? For women?
Billy, it's a cabinet, which is a piece of furniture with doors, about as high as your waist, where you can put dishes or towels.
Like this:
(I think he was referring to that sexy four-poster bed earlier in the thread.)
D'oh. That's what I get for not scrolling up.
Wednesday, I ran back over to Home Depot. The weather was nicer, so loading up the roof rack on the car was a better experience. I got several sheets of plywood, and a bunch of solid pine for the face frames.
That afternoon, I shimmed the base frame. It helps the installation a lot if the frame is flat and level. It turns out that the bathroom floor is out of level by about a quarter inch over the four feet of the cabinet base. So I had to use a lot of shims. I screwed the base down as I shimmed each piece. The result was this nice level flat platform for the cabinets.
Wednesday evening, I cut the sheets of plywood into more manageable sizes using a hand held circular saw. A little oversize for each panel. I finished up each panel on the table saw, which produces cleaner results. Then I used a router to cut grooves (dadoes, actually) into the sides of the first cabinet to accept a shelf. Here, I'm setting up to cut a rabbet, which is a lip that accepts the top of the cabinet. I'll also put a rabbet on the bottom.
Before I called it quits for the night on Wednesday, I finished cutting all the parts to the cabinet case, and stacked them up all pretty for a picture.
Thursday morning, today, I drilled holes along the rabbets and dadoes so I could screw the case together. I spread glue on each joint, and screwed everything together. It wasn't quite square when I was done, so I loosened a few screws and smacked it with a big hammer. Then I tightened the screws again. Now that it was square, I nailed a thin panel of plywood onto the back. It will help hold it all together and keep it square.
Here is the case in the bathroom. It was a pain getting it upstairs, because it's taller than all the doorways, and there were lots of tight corners to get around. I'm taking a break right now. This afternoon, I'll secure it to the base, and start working on the face frame.
Cool!
I'd love to do something like that. My bathroom is falling apart, and it wasn't particularly nice to begin with...
I finished screwing the plywood case to the base frame. It was time to turn my attention to the face frame that will cover the ugly plywood edge.
I plan to paint the cabinet face, so I planned to simply nail the face frame to the cabinets instead of using some hidden fastener. This will be much easier. The face frame will be made up of pine and the joints will be mortise and tenon joints. The side of the frame that butts up against the wall will be made 1/4 larger than I need, so I can scribe it to the wall.
The tenons are made on the table saw with a stacked dado blade raised 1/4 inch. This takes 1/4 inch off each face of the piece of wood, and leaves 1/4 inch of wood in the middle to be the tenon. For ease of operation, I also have the tenons 1/4 inch from the edges of the piece. That way I don't have to adjust the table saw once I set it up.
The mortices are made at the drill press. I have a vice at the drill press to hold the wood, but these side pieces are really long, so I have to rig up a support for the other end of the piece. I use a regular drill bit - nothing fancy, and take my time drilling these out. Then to clean it up, I slowly slide the piece back and forth with the drill bit down in the mortice all the way. It's kind of like a milling machine this way. It's not the proper way to do it. You can break a drill bit if you aren't careful, but I am slow and only do a little depth at a time.
I end up with mortices that are round on the ends and tenons that are square on the ends. Rather than go through the trouble of squaring up the mortice, which is the traditional way, I use a utility knife to knock off the corners of the tenons. The joint is still super strong, and the whole frame will be supported by nails anyway, so the joint doesn't have to do very much.
I glue and assemble the pieces. They are perfectly square and require no adjustment before putting the clamps on.
The next day, after the glue dries, I take the face frame to the cabinet box and temporarily support it on a few blocks of wood. I get it plumb, and butted up against the wall. The frame is straight where it meets the wall, but the wall, like most walls, is slightly curved in places. To get the frame to fit the wall, I have to cut it to the same curve as the wall. I figure out how much wood to remove by looking at how the face frame fits against the plywood box, and then I set a compass to that width. I drag the compass up along the wall with the pencil side on the wood. This scribes a line on the wood that is the exact shape as the wall's curvature.
I take the face frame back down to the shop. I need to remove all the wood from the edge of the frame up to the line I just scribed. A hand plane is perfect for this kind of job, but I have a lot of material to remove. The table saw is still set up with the dado blade, so I take advantage of it. I remove 2/3s of the material on the underside or back of the face frame, making a rabbet about half an inch wide. This leaves me with only a quart inch wide board to plane, and should save me a few minutes of planing time. So I plane the material down to the line.
I sand the face frame for good measure, so it will take paint well, and then I head back upstairs. I test fit it too the wall. Not bad. There are a few places with a gap as wide as a thick piece of paper, but those spots will be filled in with paint when I paint this thing.
This morning I nailed the face frame to the cabinet case. Now it's starting to look more like a finished cabinet. I'll make the doors later. First I'll turn my attention to the stacked cabinet that will fit next to this one.
wow. i am absolutely mystified by the abilities displayed here. i couldn't even begin to plan this project, let alone see it to a successful completion. :thumbsup:
Thanks. I'm always reading woodworking magazines. So I'm constantly absorbing this stuff, without actually building anything. Then when I go to build it, I have a lot more confidence.
I'm still far from being a pro. I am not fast enough. If I charged a fair hourly rate for my time, and added it to the materials cost, with a little profit thrown in, I'd have to charge like five times the going market price for a cabinet. I would starve.
But it's fun to make this stuff.
There's one bit that always mystifies me, that all woodworkers know. How do you put two planks together to make one big plank? Like two 1x8s together to make a 1x16?
That's actually a challange to me. You need the edges of each plank to be very straight, otherwise they won't fit tightly and the glue joint will not be strong. Sometimes you can get away with an edge left by a table saw or that is already on the board when you buy it, but often you have to plane one edge of each board until they are nice and straight. You can then just glue them together.
Or if you want the joint to be extra strong, you can cut a slot into each edge and fit a long thin strip of wood called a spline into that slot to support things a little more. And glue them together.
More common today is a specialty tool called a biscuit cutter. It cuts little slots in the edge and you stick a little football shaped disk into those slots when you glue it up. You have to make sure the slots line up. I don't have one of those, but most pros and factories do.
For me, the challange is when you are trying to put together a whole table top, because you have multiple pieces, and the glue starts to dry on you before you can get them all together properly.
Clamps hold the joint together, and aligned while you wait for the glue to dry.
my neighbor is a professional cabinet maker. he does some absolutely extraordinary things that i just don't get. i hang out in his shop while he and his crew build some things and i have to leave after only 10-15 minutes because i just can't understand how they do what they do.
This thread is too cool. I idolize Norm Abrams, but can't personally operate a power tool to save my life.
This is the only power tool I know of that can save your life. All the others hunger for fresh meat. I watched a fella shorten his right index finger by one knuckle on a bandsaw once. Those machines care nothing for the length of your life, unless it means they get fed something besides wood wood wood, day after day.
Although,
this machine operates so well, that I find it hard to believe. A strictly vegetarian table saw. Whooda thunkit?
That's actually a challange to me. You need the edges of each plank to be very straight, otherwise they won't fit tightly and the glue joint will not be strong. Sometimes you can get away with an edge left by a table saw or that is already on the board when you buy it, but often you have to plane one edge of each board until they are nice and straight. You can then just glue them together.
A joiner (power tool) can make a good edge, but my dad uses a hand plane and a straight edge. Use a long straight edge to find bumps and valleys, and plane them down.
Or if you want the joint to be extra strong, you can cut a slot into each edge and fit a long thin strip of wood called a spline into that slot to support things a little more. And glue them together.
Here's a cross section example.
For me, the challange is when you are trying to put together a whole table top, because you have multiple pieces, and the glue starts to dry on you before you can get them all together properly.
You just have to get it all ready before starting to apply the glue. Or you can do one joint at a time.
Nice work, glatt. :thumbsup:
stick a little football shaped disk into those slots when you glue it up.
The "footballs" are beech, I think. They're pressed and dried so they expand to hold tight when they come in contact with the glue.
How do you put two planks together to make one big plank?
If you clamp them up with an overlap then saw down the length, through the overlap, the pieces will match. Same as matching wallpaper without a pattern.
i have to leave after only 10-15 minutes because i just can't understand how they do what they do.
They do it one step at a time. To understand how, you have to break it down into those steps. To understand why, you have to do it wrong at least once. :biggrin:
but my dad uses a hand plane and a straight edge. Use a long straight edge to find bumps and valleys, and plane them down.
Your Dad is extrordinary. Most people would spend years developing that skill and some could never get it right. Knowing exactly what your hand and that plane are going to do before they do it, on every stroke, is damn near witchcraft. :lol:
Your Dad is extrordinary. Most people would spend years developing that skill and some could never get it right. Knowing exactly what your hand and that plane are going to do before they do it, on every stroke, is damn near witchcraft. :lol:
Tell me about it. I never got the hang of hand planing. Whenever I try, I get chips and skitters everywhere. I put it down to some combination of two factors: 1) I'm left handed while many planes are right handed, and 2) I never practice.

hey glatt, did you stain your cabinet yet?
I'm not sure
which thread to put this in so, as I'm now using
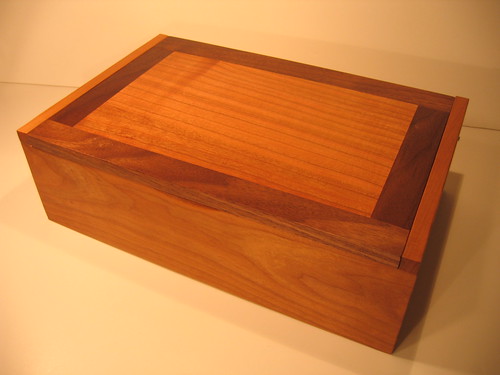
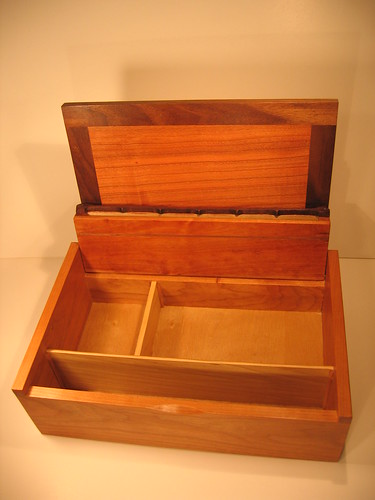
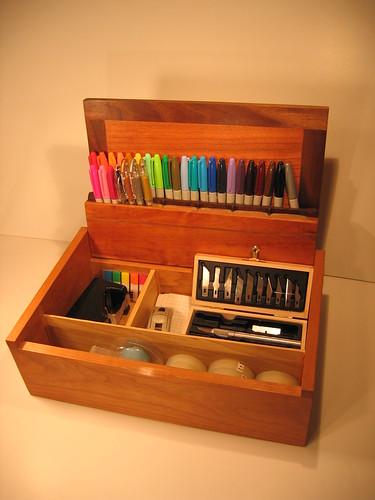
flickr, I'll go ahead and put it in both!
My dad just finished making me a cool box to store my markers and tape in. Here it is, closed, empty, and full:
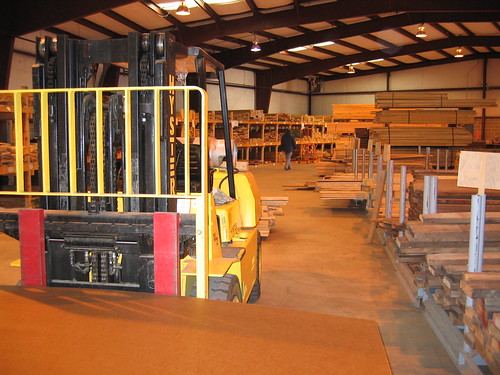
We're starting a new project, a chest of drawers for my sister. It starts with a trip to the lumberyard.

It's a pretty nice lumberyard, with good variety and quality wood. This view was substantiated during this trip when we ran into one of my dad's woodworking inspirations,
Peter Kramer. If he's willing to drive an hour to get wood there, it's good stuff.
We picked out three cherry boards, eight feet long, an inch and a half thick, and six to eight inches wide. These will be the sides of piece.
We bought the boards rough, so we put them through the planer until the faces were clean.
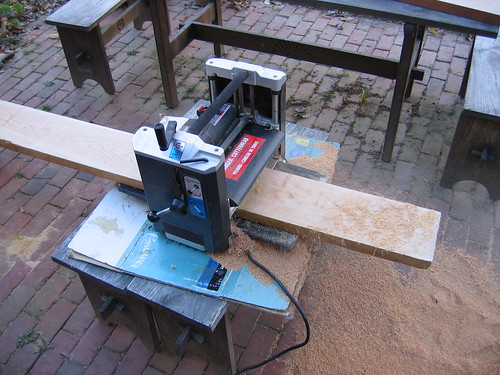
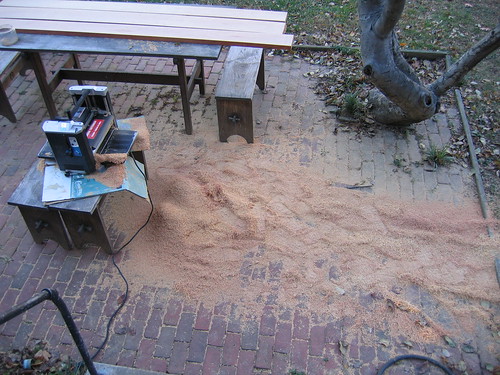
This creates a lot of sawdust.
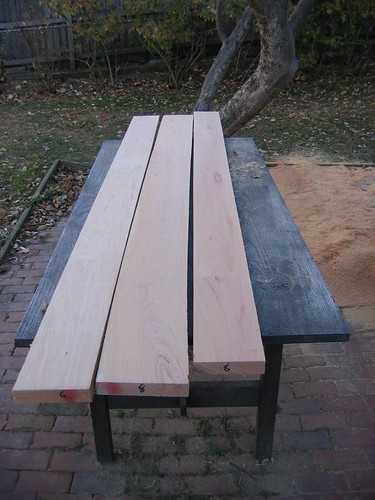
And here are the boards with the large faces even. Now for the edges.
The chest will be about four feet high, so we cut the boards in half.

Ready for edging.
We have a very nice tool that lets you run a router along a track in a straight line. Our previous efforts without this
router trolley have been much more labor intensive.
An action shot, from the side.
With the edges squared using the router and trolley, the gluing went extremely smoothly. Next up, squaring the ends.
Router trolley?
You jumped from the 19th to 21st century. :eek:
Is this a git-r-done by Christmas project?
Wait till you see the next picture...
The sides are going to be tapered; thinner at the top than the bottom. My dad is doing this with hand planes. (How's that, Bruce?)
<a href="http://www.flickr.com/photos/happymonkey/68170862/" title="Photo Sharing"><img src="http://static.flickr.com/20/68170862_931d7e8e8a.jpg" width="500" height="375" alt="Glued" /></a>
The pencil mark shows how far down we have to get at this end. Click on the photo (or, indeed, any of them) for the flickr page, then click "All Sizes" to see the line clearer.
<a href="http://www.flickr.com/photos/happymonkey/68171614/" title="Photo Sharing"><img src="http://static.flickr.com/30/68171614_5a3d880754.jpg" width="500" height="375" alt="The Goal" /></a>
And these are the planes he's using to do the tapering.
<a href="http://www.flickr.com/photos/happymonkey/68172811/" title="Photo Sharing"><img src="http://static.flickr.com/9/68172811_f96fb1886d.jpg" width="500" height="375" alt="Planes" /></a>
Hey, I wasn't being critical, it just seemed like a philosophy shift which made me wonder if there was time constraints.
btw- I got a nice email from Peter Kramer. :thumb:
No worries, I wasn't being defensive, just making a segue into the next phase.
It wasn't so much a philosophy shift as a new tool availability (we got it in August, and hadn't tried it out yet. It works great). Our power tools pre-trolley were too imprecise to get a result better than a hand plane, and power tool imperfections are harder to deal with than hand tool imperfections. Additionally, this wood is thicker than some of the handplane blades are wide, and would have been much harder to work with.
Why'd you get the Peter Kramer email?
I followed your link. Complimented his work. :blush:
Cool. It's good stuff. My parents have bought furniture from him for almost 30 years.
How about an update, HM? :worried:
It took a while for my dad to finish planing the sides down. I'll post an update soon.
I know.... good help is soooo hard to get. :lol:
C'mon HM, tell your Dad to get off his butt and entertain us. :lol:
It's not his fault this time. I've got a bunch of pictures I've been too lazy to write up. Soon...
Okay, I finally got on my butt and put up the new pictures.
Here are the sides, after my dad finished tapering them. The outside (tapered) faces are facing in.
<a href="http://www.flickr.com/photos/happymonkey/89011296/" title="Photo Sharing"><img src="http://static.flickr.com/33/89011296_240653b636.jpg" width="375" height="500" alt="Tapered Sides" /></a>
The feet were cut with the router against an arch pattern, and the detail was done with a drill and some hand tools.
<a href="http://www.flickr.com/photos/happymonkey/89011672/" title="Photo Sharing"><img src="http://static.flickr.com/39/89011672_34c76b4c6c.jpg" width="500" height="375" alt="Foot Detail" /></a>
The dwawers will rest and slide on pine frames, faced with cherry. These were put together rough, and then cut to matching size using the router trolley.
<a href="http://www.flickr.com/photos/happymonkey/89012226/" title="Photo Sharing"><img src="http://static.flickr.com/32/89012226_aab37e7666.jpg" width="500" height="375" alt="Edging the Drawer Frames" /></a>
And here they are:
<a href="http://www.flickr.com/photos/happymonkey/89012649/" title="Photo Sharing"><img src="http://static.flickr.com/30/89012649_1d29f9ac6a.jpg" width="500" height="375" alt="Drawer Frames" /></a>
The frames and the top will be held in mortises in the sides. We cut these with the router trolley again (boy did that turn out to be useful).
<a href="http://www.flickr.com/photos/happymonkey/89013054/" title="Photo Sharing"><img src="http://static.flickr.com/34/89013054_c0ddd7705b.jpg" width="500" height="375" alt="Drawer Frame Slots" /></a>
And here they are, cut.
<a href="http://www.flickr.com/photos/happymonkey/89013544/" title="Photo Sharing"><img src="http://static.flickr.com/19/89013544_919b98b1b1.jpg" width="375" height="500" alt="Sides" /></a>
OK, now I'm pretty much up to date.
(boy did that turn out to be useful).
Yeah, it's tough to beat a milling machine. :D
Thanks, man. Sorry about nagging.
Tell the truth. Your dad is really Norm Abrams, right?
No problem on the nagging... who know when I would have gotten to it otherwise?
Tell the truth. Your dad is really Norm Abrams, right?
We don't have
nearly the number of power tools that Norm's got! We
just got something that moves a router in a straight line!
The drawer frames are glued in place, and held with band clamps.
There will be two drawers on the top level. The mortise will hold the divider.
Uh........ wouldn't that be drawer guide or drawer support, frames? :eyebrow:
Yeah. They are the drawer supports.
The top has to have mortised ends, to fit in the groove in the sides. We cut the mortises first.
<a href="http://www.flickr.com/photos/happymonkey/95981881/" title="Photo Sharing"><img src="http://static.flickr.com/23/95981881_fbc11cd8dd.jpg" width="500" height="375" alt="Starting the Top" /></a>
The top has to extend past the front of the groove, so the mortise has to end before the front of the board.
<a href="http://www.flickr.com/photos/happymonkey/95982924/" title="Photo Sharing"><img src="http://static.flickr.com/12/95982924_8540bac994.jpg" width="500" height="375" alt="Top Ends" /></a>
We used the tablesaw to cut down the router groove, and tested it in the assembled frame. It was a bit tight, so we shaved it down a bit with an edging plane and a chisel.
<a href="http://www.flickr.com/photos/happymonkey/95983932/" title="Photo Sharing"><img src="http://static.flickr.com/32/95983932_0c2bff3611.jpg" width="500" height="375" alt="Fine Tuning the Fit" /></a>
We fixed up the mortise with a small saw cut and a chisel.
<a href="http://www.flickr.com/photos/happymonkey/95984839/" title="Photo Sharing"><img src="http://static.flickr.com/27/95984839_0c26240dc7.jpg" width="375" height="500" alt="Trimming the Ends" /></a>
Sliding the top into the frame.
<a href="http://www.flickr.com/photos/happymonkey/95985977/" title="Photo Sharing"><img src="http://static.flickr.com/38/95985977_d22f9e74e3.jpg" width="375" height="500" alt="Sliding in the Top" /></a>
And here it is with the top on.
<a href="http://www.flickr.com/photos/happymonkey/95987017/" title="Photo Sharing"><img src="http://static.flickr.com/34/95987017_1044c1dbc0.jpg" width="375" height="500" alt="So Far So Good" /></a>
I ran across this picture on the random blog image generator. It made me smile and wonder. :D
No, not me. I don't have a... whatever that thing on the floor is.
A groove was cut into the bottom of the top, twice as long as the divider. The divider was put into that groove, and slid forward. The center rail was then added.
The top board, while extremely wide, was not quite wide enough, so a slight extender was glued on. Then the top back was added, to minimize he chances of things falling down behind the chest.
Oh, yeah - and for looks, too.

Front shot with top drawer divider and back.

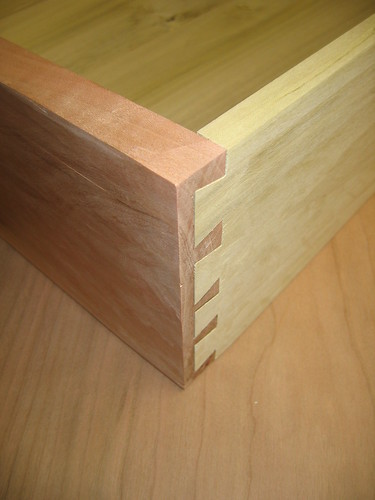
Starting the drawers: The cherry front is attached to poplar sides, with half blind dovetails.
The bottom of the drawer fits in a mortise. The drawer has not yet been cut to length.

I think that's a power planer in the picture.
Whats the reason for the different size dovetails? :confused:
No particular reason. The angle of the shot accentuates the difference, though.
The rail to keep shit from falling off the back is brilliant.
I know exactly how useful that would be.
I'd love to take credit, but we're working roughly off of a design from a reader project sent in to "Fine Woodworker Magazine".
A quick router cut is made around the back of the frame, to allow the back to be put in.

Spacers are added to the back of each drawer frame, wide enough to match the depth of the router cut from the last step.
Ok, so I'll go into some detail on dovetails. These dovetails will attach the back of the drawer to the sides.
A dovetailing square has a straight side and a tapered side. The straight side is used to mark the endgrain part of the dovetails.

This is a very nice scoring tool. I set its length to the thickness of the other board, and marked the depth of the dovetails.

Then the tapered side of the dovetail square is used to draw the dovetails, matching the markings on the endgrain and going to the scored line.

Start cutting on the line with a dovetail saw, designed to cut into endgrain. The other board is clamped along with the piece in the vise, for stability.

Once the cut is started, angle down along the diagonal line, to make sure the saw follows the line.

Then finish off the cuts.

The end bits are cut off with a crosscut saw.

The chisel rests easily in the scored line. A few pounds with the mallet cuts that line deeper.
Pop out a layer of wood with a quick chisel hit.

After a couple of cuts on one side, flip it over and start on the other, so any tearout on the last cut is in the middle of the piece instead of on either side.
Sorry for the focus.
The tails on the back piece are traced onto the ends of the sides.
The scoring tool is used again, and the square is used to mark down from the traced lines to the scored line.

The dovetail saw comes out again. Then the chisels again.

The tails are shaved down with a chisel until it fits perfectly. The drawer bottom is then marked and cut off with the tablesaw.
And here is the finished drawer.
Beautiful, now do it 5 more times. :D
You do beautiful work. I am jealous.
Thanks Harlan.
All but the last drawer is now done.
A decorative arch is glued under the bottom drawer before the final drawer front is fitted, since its attachment could slightly modify the fit.
<a href="http://www.flickr.com/photos/happymonkey/120087792/" title="Photo Sharing"><img src="http://static.flickr.com/56/120087792_983d5bd7f9.jpg" width="500" height="375" alt="Bottom Arch" /></a>
That's really beautiful =D
Thanks! All that's left now is the final drawer, the back, and then it has to be oiled and waxed.
What kind of oil are you using?
Have you used shellac much? I've just recently been experimenting with shellac, and am very pleased with the results.
Each additional layer of shellac slightly melts the underlying layer and then bonds to it as the alcohol solvent evaporates. This leaves the final finish as one uniform film, instead of multiple layers of finish like varnish or poly. When you sand it and steel wool it, you get a very pleasing result. It's so much more forgiving than varnish or poly are, and you don't get any visible strata lines if you sand through the most recent coat and into a lower one. It also dries very quickly. It's dry and ready for the next coat in about 45 minutes. The only drawback is that since it dries so fast, you can't work it with the brush much at all. Just apply one brush stroke and then go back over that brush stroke with the grain to even out any runs/drips.
Can you tell I like it?
Watco Danish Oil, and Goddard's Cabinet Maker's Wax. I haven't done anything with shellac (or varnish or poly). My dad experimented with finishes before I started helping him, and settled on the Danish oil. It's pretty much all we use now.
But if I want to make a glossy finish at some point, shellac sounds like the way to go. Though I am curious - if it's alcohol soluble, what would happen if you spilled a drink on it? Does it eventually cure completely?
If you spill booze on it and don't wipe it up right away, you mess up the finish. But, it's very easy to repair. A little wax will add some (small) protection against a booze accident.
And it completely cures in 45 minutes or so.
Shellac is easy to damage but also easy to repair, which is a good trade off and it usually keeps the wood from getting screwed up better than oil/wax.
Nice work, as usual, HM. Notice any difference in dovetail fit from the first to last drawer? :)
I didn't get a chance to do many of them this time around. My dad's doing most of the work on this piece, I'm afraid.
That's cool, better to be Norm than the guy laboring off camera. :D
It's for your sister anyway, isn't it?
Too often, I'm the cameraman, though.
Yeah, it's for my sister. Which will make delivery (to Cambridge, MA) a bit of a trek. But I suspect I'll let my dad do that, too...
Well, we're getting closer. The weather's nicer, so my dad's off to West Virginia most weekends, which has slowed things down a bit.
But he got some hardware in.


The carcass and some of the drawers have been oiled. An unoiled drawer is shown for contrast.

Beautiful wood, beautiful job, are those generic knobs or something old/reproduction?
I've got white porcelain knobs on my dressers but really should have pulls because I tend to overload the drawers.:redface:
They're reproduction. They're cast, not milled. About $20 each!
Yeah, I noticed the cast threads that's why I asked if they were old. The cast brass coloration is perfect for that color stain. Great job, your sister should be giddy. :thumb2:
Thanks, but I just have to emphasize that this particular one is much more HMD than HM, at least recently.
Gods, the thing is gorgeous! Wonderful work!
very cool!
I always think I could refurb furniture if I had disicpline. I respect the people who actually do. :thumb:
Thanks! I'll try to put up another couple pics tonight. My dad is this close > < to finished. All of the drawers are made, but one more needs to be oiled and knobbed. The back is on (except for the final slat). All that is left after that is waxing.
And here they are:
One drawer still unoiled and unknobbed.

The back is mostly on. One slat of poplar has been left off for easier access to the inside, until it's done.

A beauty shot of the side, displaying the dovetails.

Gorgeous. Did you ask your sister if she'd arm wrestle you for it?:D
It'll be a bit of an arm wrestle to get it to her place in Cambridge...
It'll be a bit of an arm wrestle to get it to her place in Cambridge...
Well, I could pick up and keep it at my house until the next time I go to Cambridge.......some time.......eventually....:rolleyes:
Great work! Shall we start the bidding?:)
I like the lip on the back to keep the crap from sliding off the top. I wonder if I'd keep the top clear if my dresser was that pretty? Na wouldn't happen, I need an intervention.
Thanks!
Yeah, all my nice furniture is completely covered with clutter...
I'm amazed by your talent HM, it's wonderful. Can I have it? :)
Sorry, it's spoken for... but thanks! Also, modesty requires that I shift most of the credit over to my dad. I'm afraid I didn't do much more than take the pictures once the first drawer was done.
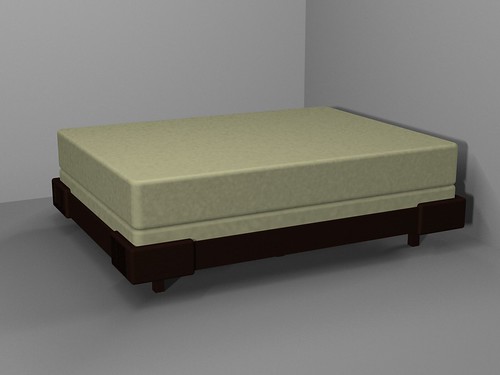
I got a pile of wood for Christmas!
I'm hoping to turn it into this:
Awesome! How do the pieces join?
First step was to plane it smooth.

The planer makes a bit of a mess.

A friend of a friend, recently acquired a tractor-trailer load of exotic woods. Planks 1 to 4 inches thick, and 1 to 3 feet wide, very cheap, but probably exported/imported illegally.
Awesome! How do the pieces join?
I puzzled over that for quite a while, over several iterations. I finalized (I think) the design just yesterday, on the way to the lumberyard.
The frame is extremely simple; four boards with a ledge on the inside, held together with bolts and cross-dowels,
like this.
The middle rail is held in place with dowels in the ends going into the ledges.
The corners are the tricky part. They support all of the weight, but I wanted the feet to be recessed, to give it a bit of a "hovering" look, so they couldn't directly support the sides. Instead, the two halves of each foot will be held in the bottom of an L-shaped base via sliding dovetails. The mentioned base will be two ash boards lapped together.
Exactly how it works should become more obvious in time.
A friend of a friend, recently acquired a tractor-trailer load of exotic woods. Planks 1 to 4 inches thick, and 1 to 3 feet wide, very cheap, but probably exported/imported illegally.
Heh, thanks, but I probably can't handle it, then. Not to mention transportation from PA.
So is the one lighter-colored board for the cross beam underneath, or will it be visible somewhere? (Or is it for another project entirely?)
It's the ash for the bottoms of the corners. Ash is cheaper and stronger than walnut, and the bottoms of the corners need to be extremely strong. I'll need to do some cosmetic stuff to make sure the ash isn't visible.
The cross beam won't be walnut either, but we'll use some wood from our spare wood pile for that, and it isn't in the pictured purchase pile.
A friend of a friend, recently acquired a tractor-trailer load of exotic woods. Planks 1 to 4 inches thick, and 1 to 3 feet wide, very cheap, but probably exported/imported illegally.
shush...
[COLOR="White"]I believe you have my address just in case this "friend" needs help disposing.[/COLOR]
Awesome! How do the pieces join?
I puzzled over that for quite a while, over several iterations. I finalized (I think) the design just yesterday, on the way to the lumberyard.
Here is that design:

And the rail design:
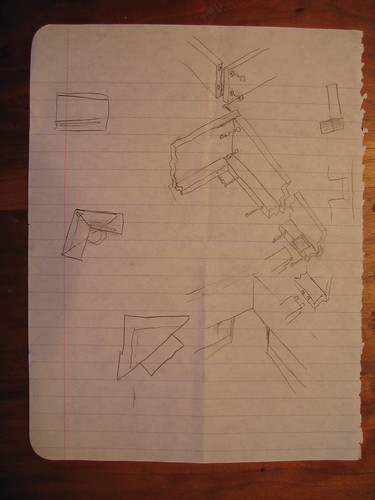
And here are some of the early designs for the corners.


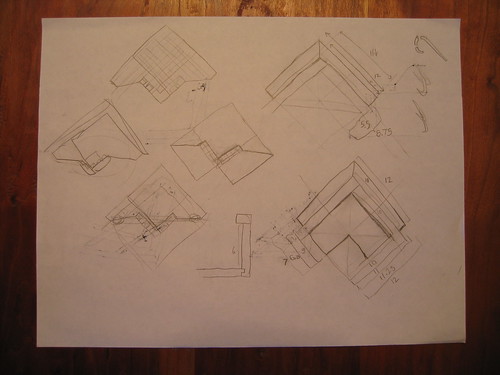

This last one also has the shopping list we took to the lumberyard.
Beautiful job - you're quite crafty:)
I'm thinking I need to consult with HM before I start my wood working projects! Have a look in thread fail. Good job mate. bb
I had a bit of a FAIL myself, today.
I was too clever by half when I wrote the dimensions on my shopping list on that last photo above.
See that "60+2T ~62"? Guess which number I used, when making the cut?
Dammit. I can fix it, and that part won't be visible, but still.
Dammit.
Yeah. That's why I alway stuck to metal. A lot easier to weld over the screw ups.
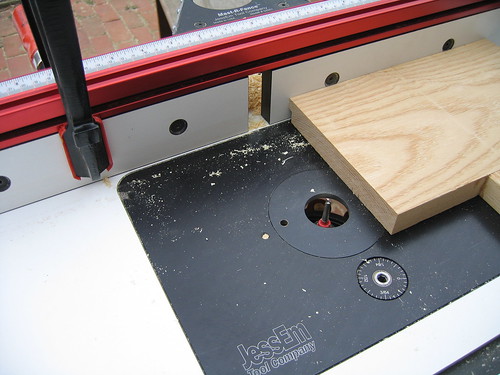
OK, I'm gonna start getting caught up to what I've put on Flickr.
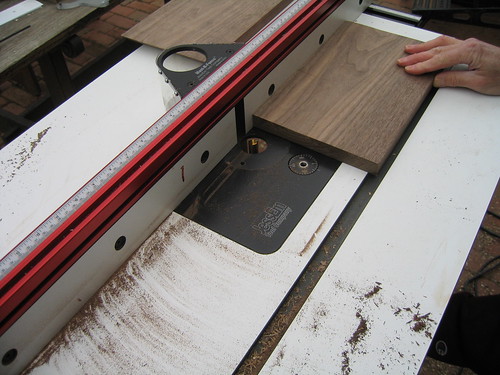
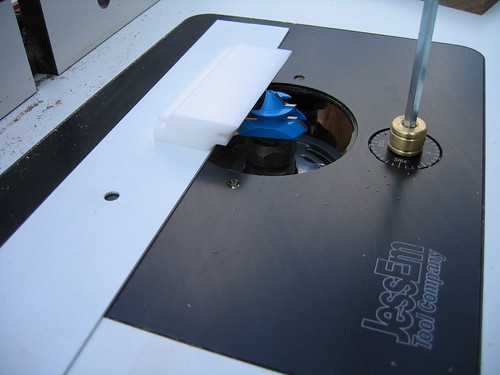
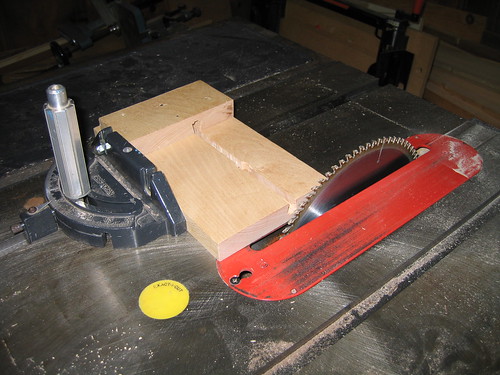
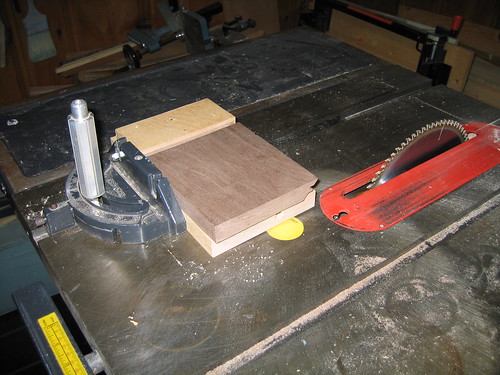
My dad got this excellent router table for Christmas. We used it to put a nice edge on all of our boards. There's a shim behind the left half of the fence (the board moves to the left), that matches the depth of the cut, so the board hugs the fence on both sides of the bit.

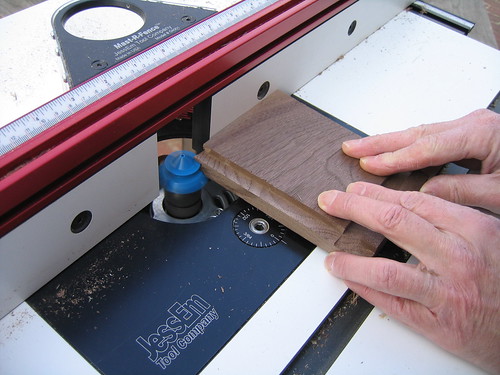
This is not an action shot. When we actually cut off the ends, we were more careful to make it square. Of course, as mentioned above, square is one thing, the right length is another.
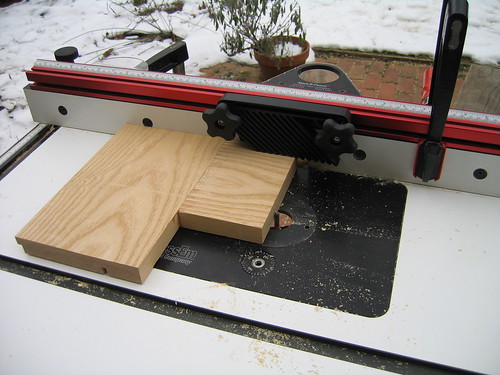
We tried and failed to use the router table to cut the boards to width. I think we were pushing the board in the wrong direction, but in the meantime we finished the job on the tablesaw, which is the right tool for he job anyway.

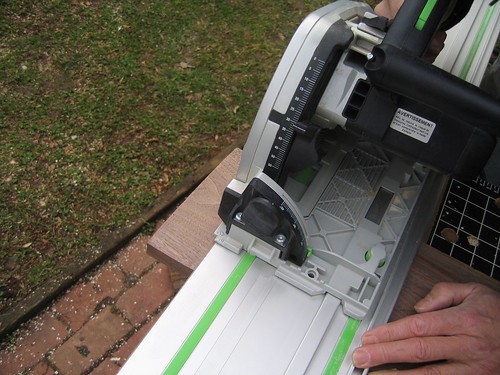
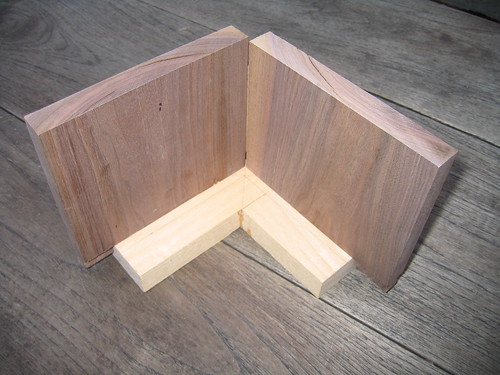
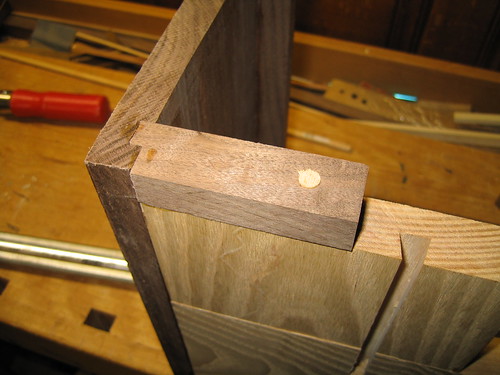
Starting to cut the corner sides. They will be mitered, and the saw tilts to 45 degrees. I marked 12 inches on one side, used a spare bit of 45 degree wood to mark the edge, and marked where to make the cut.
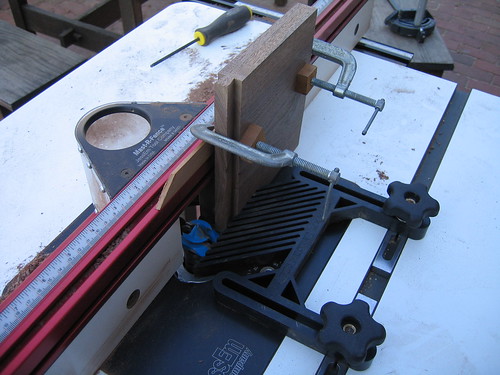
When making the cut, I used a square to make sure that the saw guide was square, while my dad made the cut.

Flip the board, and cut another 45 degrees on the same line.

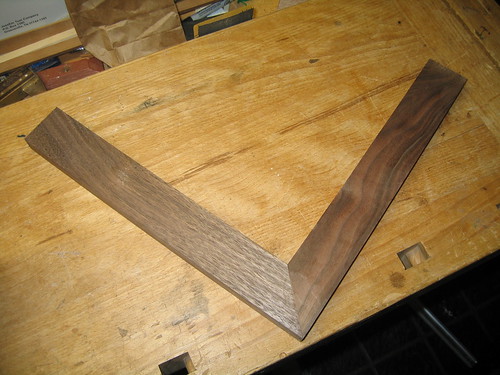
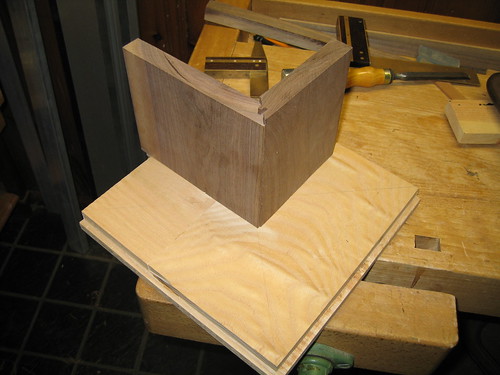
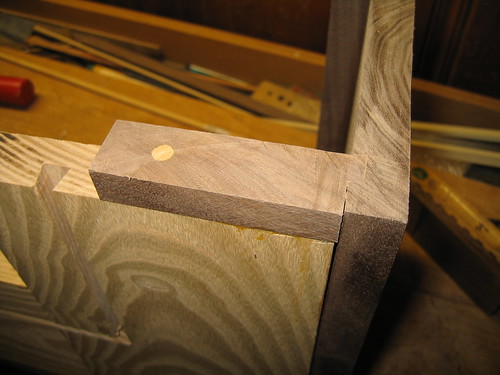
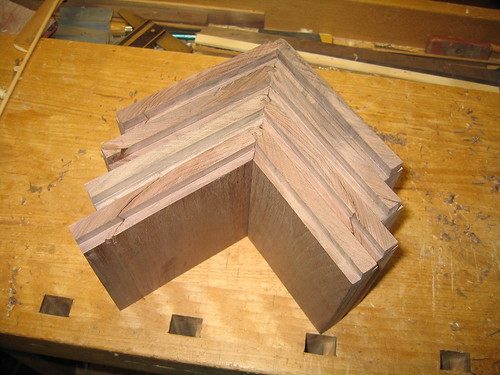
A 90 degree notch was cut out.
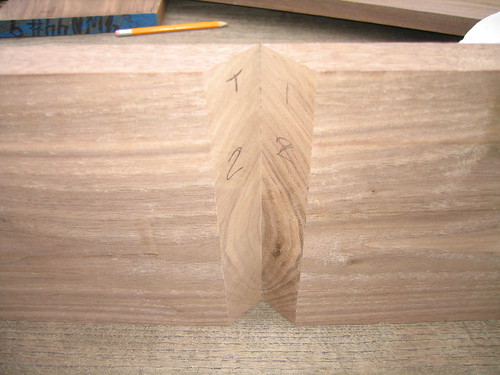
The grain remains unbroken across the joint.
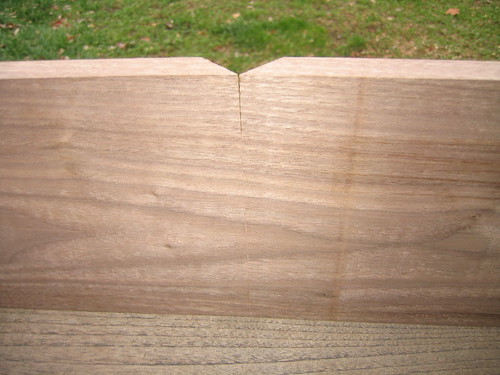
Looks good.

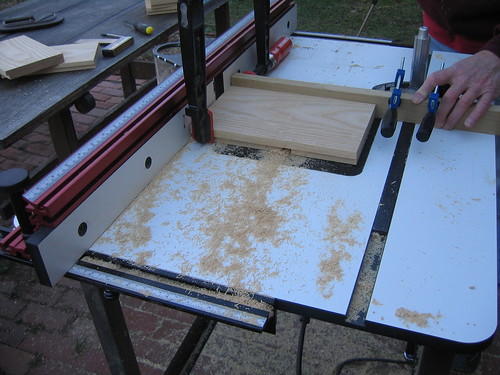
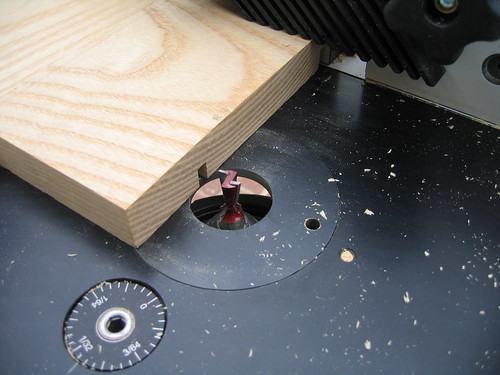
Back to the router table to cut a groove for the bottom.
Move the fence and adjust the height a bit, and cut the tongue to go into that groove.

Eight of each.

Glue up the miter. The clamps on the bottom ends are only there to lift the ends to the right height.

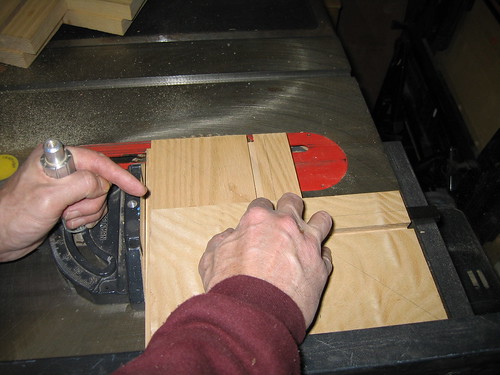
Splines strengthen the joint. The tablesaw cuts some grooves.

The grooves.

Shave down a strip of wood to tightly fit the groove.

Glue the splines in.

The excess wood is cut off with a saw, and the joint is complete.

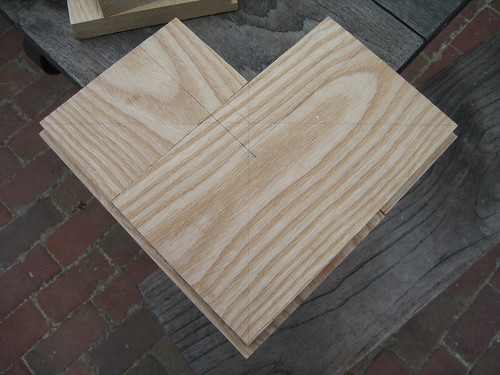
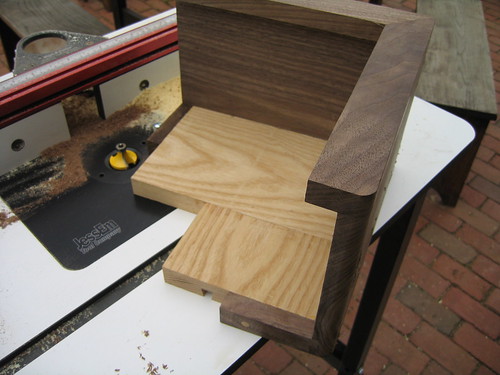
The bottom of the corner is made up of two pieces of ash forming a huge lap joint. We used the router to cut away the bottom of half of the eight ash pieces. About a third of the board was removed.
Here it is, upside down. The lap matches the tongue. So to speak.

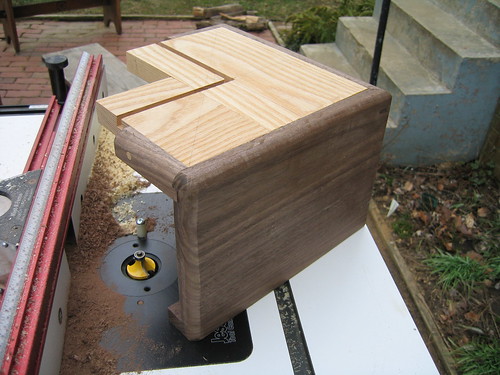
The other half of the joint has the top removed.

Like so. This one is rightside up.

Just placed together, it's OK, but it needed my dad to finish it up with a bit of planing and chiseling. And just a tad of tablesawing, to adjust the edge.

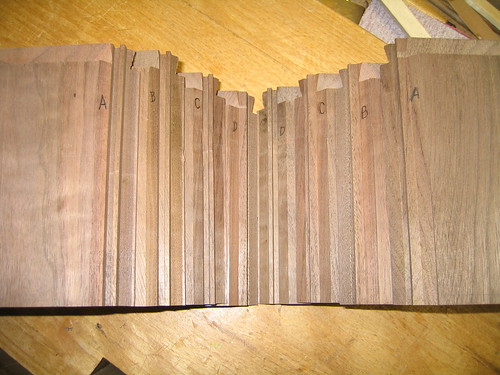
All the bottom pieces. Bottom halves on the left, upside down; top halves on the right, rightside up.
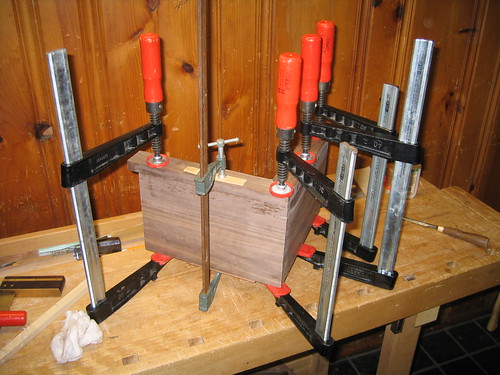
The lap joint is glued. The bar clamps hold it square, and the C-clamps hold the glued faces together.

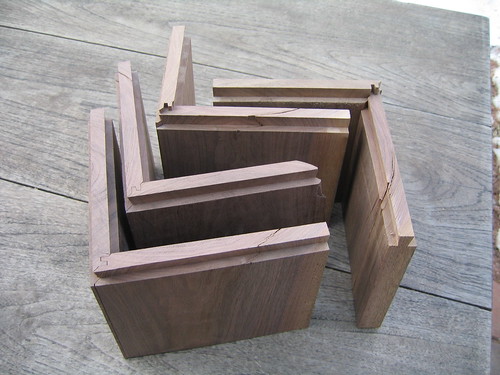
The result.

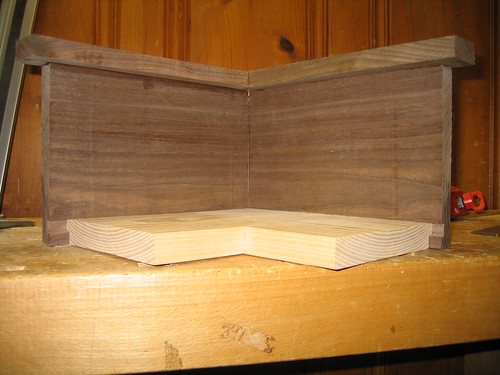
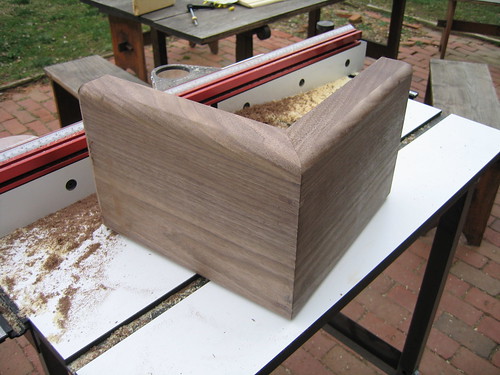
All together now. The tongue on the outside of the ash bottom fits into the groove on the inside of the walnut sides.
There will be walnut caps on the end of the ash, to fill in the remaining space.

All four - inside and outside.


That's all for now!
This is really interesting. At first, I couldn't figure out your design from all the parts you are cutting, but then looking at
this image on Flickr, I get what you are going for.
I'm curious though, why do you have the long cross support board in the center of the bed frame, but you are using just the corners for support at the head and the foot? Why didn't you use a long wide board to support the mattress and frame at the head and foot as well? (See my sloppy alteration of your plan below.) Is it simply to save materials and to give you the opportunity to play around with half lap joints, or am I missing something?
This isn't a criticism at all, the design is a cool one. I like the look of the bed. This is a good thread and I'm glad to see it revived.
It's hard to see in the picture, due to the color I used, but there will be a ledge all the way around the rails, so the bed will be supported all the way around, in addition to the cross support in the middle.
That ledge will be on top of the ash, so the mattress doesn't rest directly on the part you've seen so far.
[code]
[COLOR=darkorange][COLOR=white]..[/COLOR]MMMMMM[/COLOR]
[COLOR=blue]CC[/COLOR][COLOR=darkorange]MMMMMM[/COLOR] [COLOR=darkorange]M[/COLOR] = Mattress
[COLOR=blue]C[/COLOR][COLOR=magenta]R[/COLOR][COLOR=darkorange]MMMMMM[/COLOR] [COLOR=blue]C[/COLOR] = Corner (the part I've been making)
[COLOR=blue]C[/COLOR][COLOR=magenta]R[/COLOR][COLOR=darkorange]MMMMMM[/COLOR] [COLOR=magenta]R[/COLOR] = Rail, including ledge
[COLOR=blue]C[/COLOR][COLOR=magenta]R[/COLOR][COLOR=darkorange]MMMMMM[/COLOR] F = Foot
[COLOR=blue]C[/COLOR][COLOR=magenta]RRR[/COLOR]
[COLOR=blue]CCCCCCCC[/COLOR]
[COLOR=white].....[/COLOR]F
[COLOR=white].....[/COLOR]F
[/code]
Cool. Can't wait to see more.
Bleh. Had an annoying weekend. Enamored with our new toy (the router table), we got cute with the joint attaching those bottom right [COLOR=magenta]R[/COLOR]s. As a result, we ended up messing the rails up further (in addition to cutting two of them too short, as mentioned above). The required repairs for that damage mean that we actually moved backwards over the weekend.
I was bummed for a few hours after that.
sorry to hear that, but comforted that I'm not the only one who does stuff like that.
The learning curve is actually a sine wave. The highs and lows will even out, and you'll end up with a beautiful bed.
How right you are. Last weekend went very well. But before I get to that, I'll try to catch up. I've been lazy uploading for a while now.
We made the tops of the corners. Starting with a bit of narrow walnut, we made it a bit narrower with the tablesaw.
My dad got this miter saw for picture frames, and it works great for this, too.
I got him these clamps for picture frames years ago, and they've come in very handy.
The joint looks good.
Clamp and glue the top on. Lots of glue joints in this piece; no way around it, given the look I'm going for.
The corner with the top, outside and inside.

Now for the sliding dovetails. The feet will be made of two boards attached at a right angle in sliding dovetails on the bottom of the corners. The point of that right angle has to cross the line of the diagonal between the two points at which the rails exit the corner.
The router table makes sliding dovetails possible (OK, feasible). We prepare for the dovetail bit with a straight bit. One with a screw shape may have been better, as the groove left by the bit was hard-packed with sawdust that was difficult to get out, even with a screwdriver.
The clamp on the router table fence is an easy way to stop it at the right point.
We moved the clamp to the other side, and cut in the other direction.
We then ran the dovetail bit through the same path.

We ran the dovetail bit along each side of one end of each foot board as well, and voila!
OK, I'll try to get more caught up.
The two halves of each foot connect with a lock miter, another product of the router table.
I raised the template block on a shim so the bit was centered on the thickness of wood I was using. I'm not 100% certain that that was the best way to do it, but it worked. If I try it again on a more visible joint, I may have to do more experimentation.
Additionally, the bit was too wide for the table insert we had. Maneuvering without an insert was tricky. We have since gotten more inserts.
One piece must be cut horizontal:
And the other vertical. This one was trickier. We clamped a strip of wood to the board, and ran that strip along the top of the fence, to keep from falling into the hole left by the lack of an insert.
All the boards laid flat:
And put together. They haven't been cut to final length yet.
Due to the way we did the lap joint, the bottom pieces were not all of a uniform length in each direction. A quick cut against the fence on the tablesaw fixed that.
Check out the fit of the feet, and how much extra wood we have on the long board, and how short the short one is.
At long last, it's time to glue he bottom into the sides.
We need a walnut facade on the outer edge of the bottom, as that part will be slightly visible. We cut a notch into the end of a narrow board, and then cut off three and a half inches.
The facade is clamped in place, and a hole is drilled for a dowel. Endgrain isn't good for gluing, so a dowel is needed. A single dowel should be sufficient, as this should not bear any load.
Glue on the facade and hammer in the dowel.
Cut off the excess dowel, and plane the joint smooth. We used the tablesaw for this one, but that was too much of a hassle, so my dad planed the rest of them.
I made a jig to cut all of the feet to a uniform height. The dovetailed end of the board goes up against the block. With boards this short, this is much safer and easier than a fence.
All the same height now. One is too short. I'll fix that later.
To give the illusion that each corner is a single block of wood, and to avoid nighttime skinned shin injuries, the edges are rounded over, using a half-inch roundover bit.
The roundover bit has a guide on it, so you don't need the fence. However, to reduce chatter when first contacting the bit, there is a post screwed into the router table surface. Holding the piece up against that post when contacting the bit makes it easier to maintain control while waiting to contact the guide.
I did the outside edges first, so the bit would run along the curved surface when doing the top and bottom.
I then did the bottom, and finally the top.
I was originally going to round over that corner, but my parents convinced me not to, to add a point of contrast.
Time to finish up the corners, by attaching the feet!
After a bit of sanding, to make the sliding dovetails easier to adjust during gluing, I slid them in place, and added glue to the lock miter joint, taking care to get it in all the nooks and crannies.
I (earlier, not pictured) cut off the excess wood from the long feet, and kept one of those pieces to fix the short one, shown here. The extra piece even came pre-dovetailed!
Better safe than sorry- I also added a glue block to the inside of the joint.
And, speaking of better safe than sorry, I added a bit of hardware to the rails.
And speaking of the rails, it is time to attach them together. To allow them to be taken apart, they are attached with
bolts and cross-dowels.
To help make the bolt holes straight, the initial hole is drilled with the drill press (Sorry for the psychedelics, my camera was set to nighttime mode).
In this picture, you can also see the solutions for the two major mistakes made on the project. The board is capped to make up for
cutting it too short, and you can see the wood strip filling the groove we
messed up on.
We held the rails in position with a square on the bottom, and a framing clamp on top.
With the boards held in position, and the first part of the hole predrilled, going the rest of the way wasn't too difficult. Out of eight holes, only one got appreciably off course.
We then took it apart, and drilled the last bit.
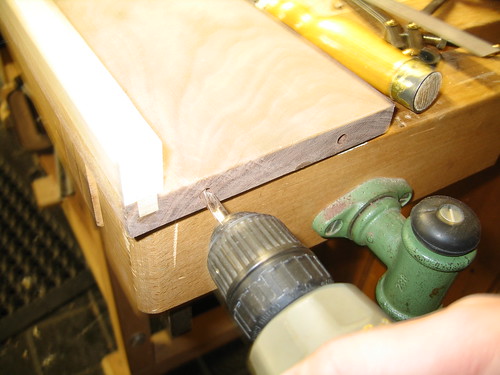
I used a square to mark where I hoped the bolt had gone, and drilled down on that line with a bigger bit. For the one that got off course, I had to do this a second time to enlarge that hole.
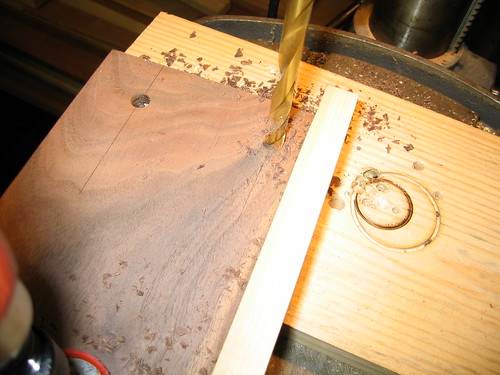
After the holes are drilled, and the correction made, it goes together.

The bolt heads stick out a bit. The rails have to fit snug in the corners, so the bolts need to be countersunk.
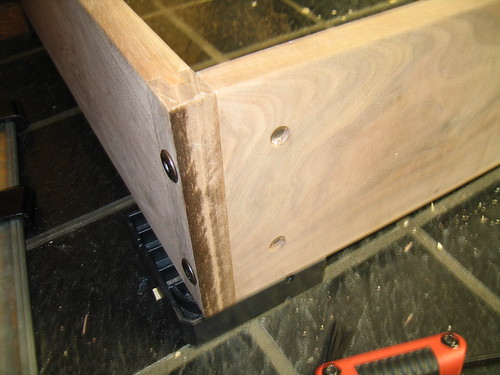
Initial holes are cut with a forstner bit.
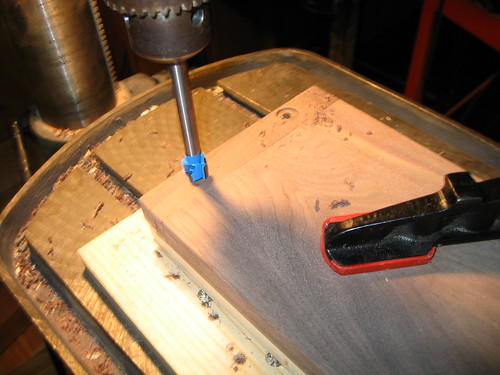
The bit wasn't quite big enough, so it was finished with a chisel.
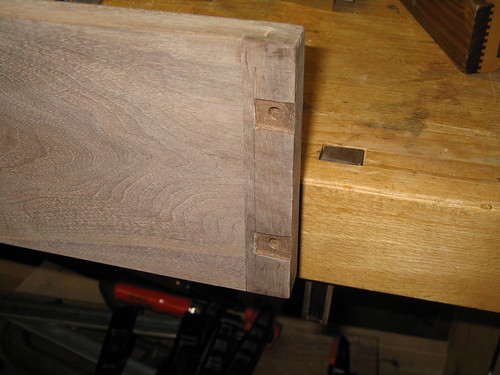
Time for staining! My dad made a picture frame with an interesting color that I liked- walnut with an ebony stain.
Initially, it is very black.
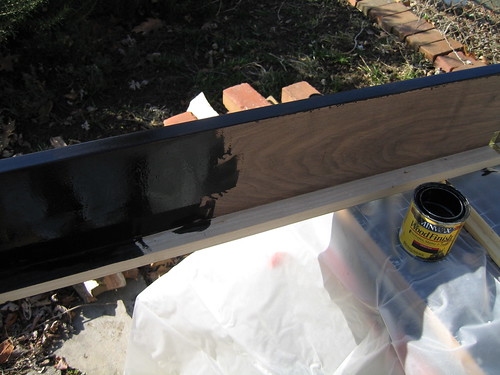
After letting it soak, we rubbed off the excess with a rag.
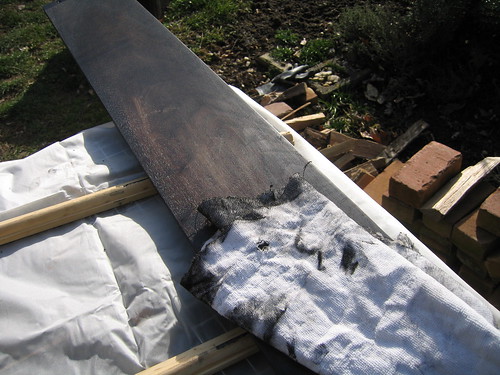
The walnut is more visible through the stain as it dries.
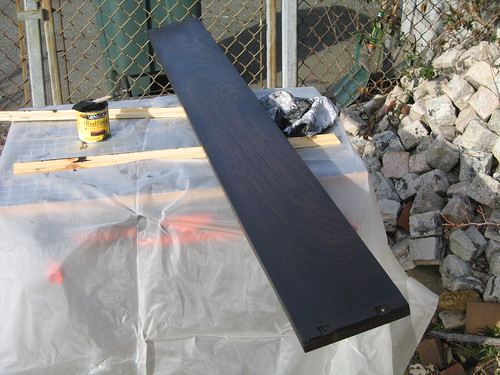
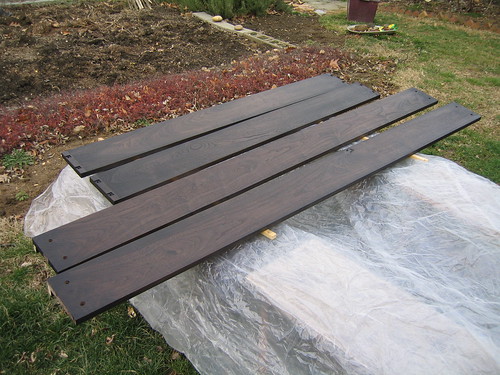
The corners get the same treatment.
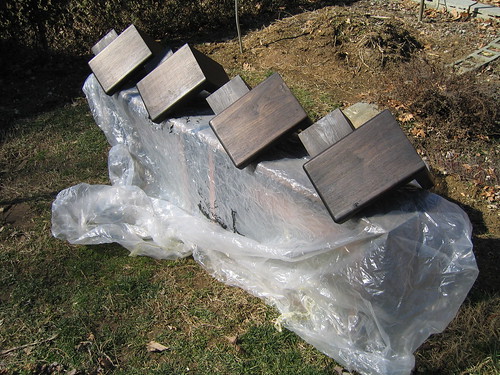
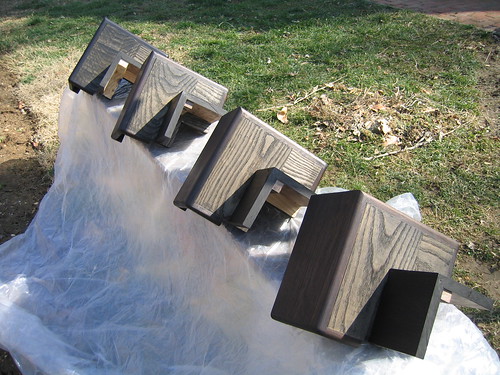
This one was trickier. We clamped a strip of wood to the board, and ran that strip along the top of the fence, to keep from falling into the hole left by the lack of an insert.
Elegant solution. Simple and effective. I'm not sure I would have thought of it, but it's obvious in hindsight. I'd probably end up freehanding it and messing it up.
This whole project is coming together nicely!
Thanks! I'm not quite caught up to the present yet, but I am caught up to what I've uploaded to Flickr. More to come.
We put it all together in preparation for drilling the holes for the final bolts.
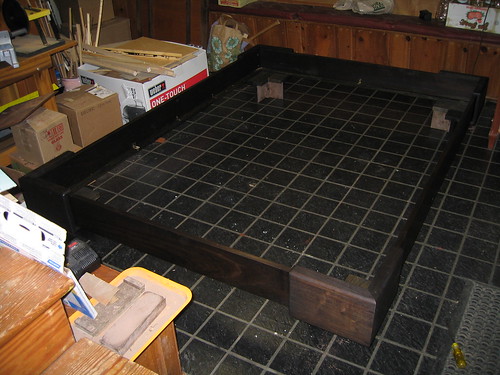
With clamps holding the corner tight against the rails, a jig holding the drill straight, and a stop collar regulating the depth, we drilled holes for the bolts that hold the rails to the corners. The holes are wider than the bolts, to allow for adjustment when tightening the bolts.

The holes go through the rails, and mark the target spots on the corners.

To maintain straightness, we used the drill press to finish the holes.

Brass inserts will hold the bolts without stripping the wood. A ratcheting screwdriver is perfect, as cordless screwdrivers just don't have the power, and non-ratcheting screwdrivers require constant readjustment of your grip.

Everything was oiled...

and (after curing for a few days) waxed.

And everything was complete!
Here are the completed corners. You can see the edges of some smooth furniture gliders on two of them. I put the gliders on the other two after the picture was taken.

And the sides.

And with the help of a handy cordless screwdriver, it comes together!
If you look back to the
original plans, you may notice I omitted the middle slat. After checking how my current bed was set up, I decided that the extra slat wouldn't have helped appreciably, and skipped it.
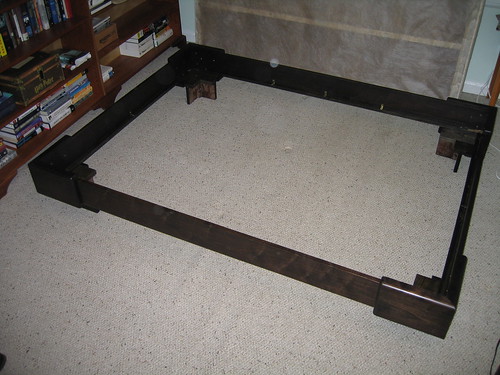

And with the mattresses:
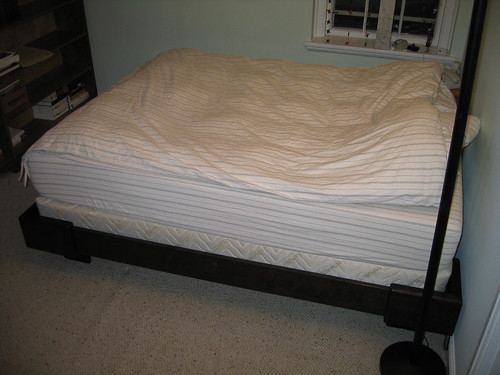

Aaaahhh....

Sweet... and sweet dreams.
It'll be beautiful and useful for decades and decades!
Cool! Now all you need is a matching nightstand....
Wow...that is awesome - looks fantastic!...and you're a lefty too!
That is so cool. So cool! Awesome job!!
I really like how it turned out. Great job!
Thanks, it really ended up matching my initial plan quite well, which is cool. The outer corners aren't rounded over, the feet are shaped a bit differently, and there's no middle slat (which isn't visible anyway). Other than that, it looks just like I envisioned.
I currently have an endtable my grandfather made on one side (occasionally slightly visible in those last photos), and a storage box nee shipping crate on the other (moved out of the way for the photos). Neither of which match particularly well, but i like them.
For now...
This, for those with proper eyewear, may display the hovering better.
Here's a
bigger version, if you like.
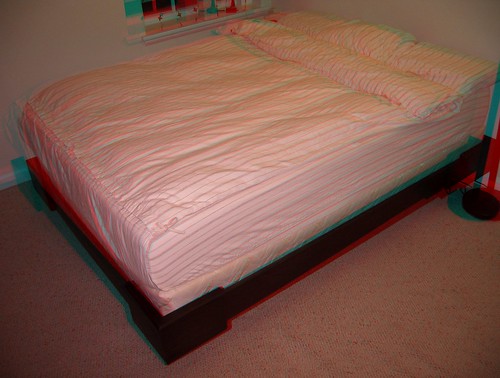
Yeah, this is great! Some glatt stuffs in there too.
You guys could do a woodworking show.
Some glatt stuffs in there too.
Holy crap! That was 7 years ago. I
still haven't finished that cabinet. It's fully functional, but doesn't have any doors. The cabinet and shelves are all open.
I need to finish that.
I'm in the contemplation phase of my next project. I have a crappy table that came with my place, and want to replace it with some sort of chest/table with cabinet doors and full-extension sliding shelves, so I can organize all of the stuff that I currently pile on top of the table.
My last project was getting rid of wall-to-wall carpeting in my condo, and redoing the shoe molding, but I was too tired to document it.
working on floors and shoe molding BLOWS. all that bending over, and crawling about. blech.
Thanks for resurrecting this thread. I missed it the first time around. Great stuff.
Wood working intimidates me, so I tend to just slap stuff together. If I showed you guys the workbenches I knocked together you would laugh (they aren't stable enough by half).
My dad and I threw something together real quickly over the last few weekends.
My washer/dryer (stackable) are in a closet, with very difficult access. I'm going to need to replace them soon, so I finally did something that I've wanted to do for a while - made a roller that fits in my closet.
Here are the materials (though I did end up going back for more hardware).
The handles are spare big-screen TV handles that I rescued from the garbage. The wheels are actually intended to be solo furniture rollers, but I didn't like that they were loose.
The boards are leftovers from an inlaw's floor remodeling.
 furniture roller materials
I cut the boards to a bit under 2 feet.
 Cutting to Length
 Cutting to Length
Here they are, just held together by friction. One is longer, because we intended to cur that side even once it was all joined.
 All the pieces
Gluing it up. The glue won't really hold (it's the tongue and groove flooring; bad glue surface), but it will at least hold it well enough to finish the piece. Bar clamps pull it together, and the other clamps and boards keep it flat. The discolored one at the bottom is just there to protect the edge, and is not glued.
 Glued up
Once that glue was dry, I drilled pilot holes in the end board using a drill press, then drilled through that into the main body using a hand drill. I glued that one on with the screws in to keep glue out of the pilot holes.
 Gluing on the handle board.
As I said, glue won't hold all that well (plus the wheels need to attach to something), so here we screwed on some boards to be the cross supports.
 Screwing on the Cross Supports
With that support in place, we cut it with a circular saw against a straightedge to even it off (but I forgot to take the picture).
 Ready to be cut even
I then screwed on the handles (hard to see, since they're matte black).
 With the Handles - top
 With the Handles - bottom
So the new machines will stack on that roller so you can pull them out?
It's a very nice looking roller system. Well done.
Thanks, yeah. Washer/dryer go on top.
Still haven't got the new washer/dryer, but I got the old ones on the roller.
 In place
The link is set to private, so I can't see it.
I bet that was a pain in the ass, wrestling that thing up on top of the stand. Did you wrench your back?
The private link should be fixed now.
Lots of sweat involved.


